BrainVoyager v23.0
Creation and Test of ANCOVA Models
The ANCOVA Dialog
The ANCOVA dialog is used in BrainVoyager to specify a RFX ANOVA model suitable for a particular experiment, e.g. from a fMRI, DTI, ICA, GCM, or cortical thickness study. The dialog (see snapshot below) can be launched using the ANCOVA Random Effects Analysis item in the Analysis menu. When the ANCOVA dialog is called from the Analysis menu, the program expects to calculate statistical maps based on a provided GLM data structure. The dialog can also be called for ROI ANCOVA anlysis using the ANCOVA button in the VOI Analysis Options dialog, which itself can be called from the Volume-Of-Interest Analysis dialog (for details, check the description of the supported models). If the ANCOVA dialog is called from the Analysis menu, it is checked whether a GLM data structure is already available in working memory for the current document (VMR or SRF data). If no GLM data structure is available, the dialog shows only the GLM / AVA tab (see below). The ANCOVA dialog accepts as input:
- a separate-subjects GLM (RFX-GLM)
- a multi-subject VMP data set
- a multi-subject, cortex aligned, SMP data set.
If a multi-subject GLM is provided, the set of beta values per subject are extracted at each voxel (VMR GLM) or vertex (SRF GLM) serving as input (dependent variable) for the second-level RFX analysis. The Browse button in the Multi-subject GLM file field can be used to select an appropriate RFX-GLM file for the respective fMRI study. If a multi-subject VMP or SMP data set is provided as input, the same number of sub-maps must exist for each subject and the names of the sub maps must follow specific conventions. For details on how to use multi-subject maps as input, consult the explanation in the Single-Factor ANCOVA topic.
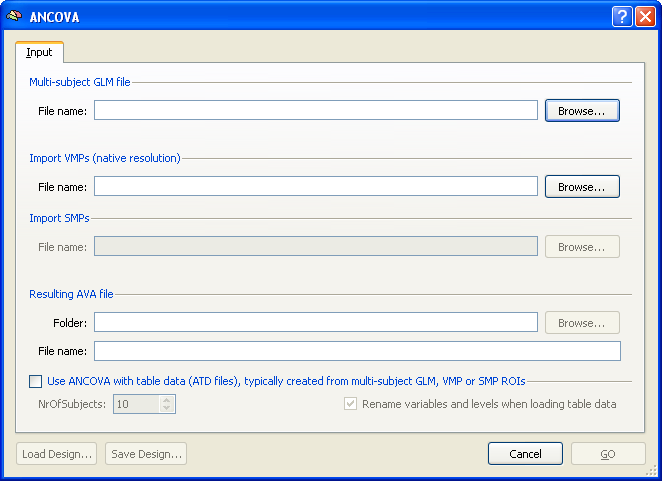
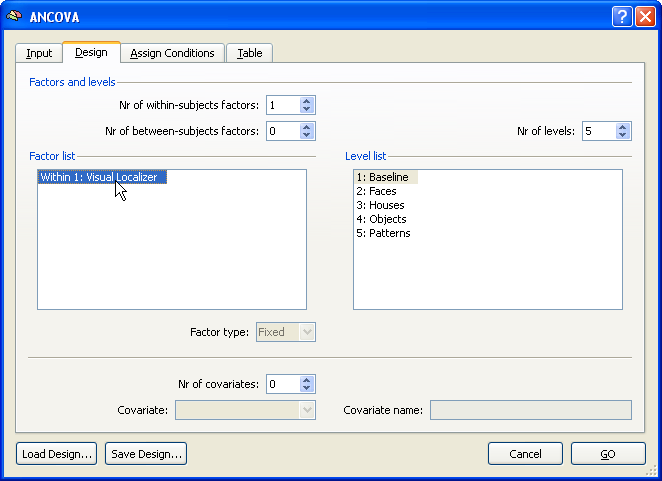
After providing a multi-subject GLM, VMP or SMP as input, the ANCOVA dialog presents several additional tabs switching to the Design tab (see snapshot below) as default. This tab can be used to specify one of the supported models (see below). Furthermore, the Table tab is made available, which shows subject-specific data in case of ROI ANCOVA analyses. The Table tab also allows to assign subjects to groups in models with a between-subjects factor and to add covariate values for a analysis of covariance model. As default, the ANCOVA dialog assumes a single-factor repeated measures ANOVA model listing all conditions found in the multi-subject GLM as levels of a within-subjects factor in the Level list. The design can be changed by editing the No. of within-subjects factors and No. of between-subjects factors fields. Depending on the chosen design, additional tabs might become available - for further details, check the description of the supported models. For each added factor, the number of levels and associated names can be specified. To change a factor or level name, text editing mode can be activated simply by double-clicking on the displayed name.
When the specification of the design has been completed, the ANOVA model can be calculated by clicking the GO button in the bottom right corner of the dialog. The ANOVA calculations are executed for each voxel using the voxel's beta values of all subjects. The resulting data structure for a specific ANOVA design will be saved in a file with the extension "AVA". After having calculated the AVA file, it can be used as input for the Overlay RFX ANCOVA Tests dialog at a later time without the necessity to recalculate the ANOVA model. If the ANOVA dialog has been called from the VOI Analysis Options dialog, the specified ANOVA model is calculated over the beta values estimated from the subject-specific VOI time courses. The ROI ANCOVA calculations are executed by clicking the Compute button in the Table tab. The results of the ROI ANCOVA calculations are presented in a HTML document containing a series of tables reporting, among other information, the significance of main and, if available, interaction effects.
The Overlay RFX ANCOVA Tests Dialog
The Overlay RFX ANCOVA Tests dialog is used to test main and interaction effects as well as specific contrasts based on a available AVA data structure. If this dialog is called and no AVA file is available, most options are disabled (see snapshot below). In that case, the Load AVA button can be used to select a AVA input file. The program tries also to load the original RFX-GLM file from which the AVA file has been calculated. While the GLM file is not necessary for overlaying ANOVA tests, it allows to present the Voxel Beta Plot dialog showing the input data (beta values) at the voxel under the mouse cursor.
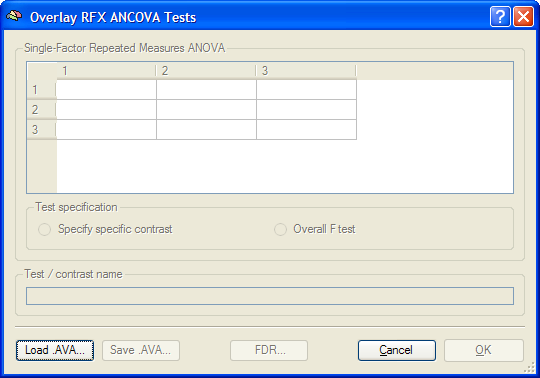
After loading a AVA file, the dialog will adjust its layout to the specific ANOVA design detected in the AVA file.
Conventions for Description of ANOVA Designs
If a design has multiple factors, the levels of the first factor ("A") will be running fastest, followed by the second factor ("B") and so on. In a 3x2x2 factorial design, for example, the levels would be represented and visualized in the order [A1-B1-C1], [A2-B1-C1], [A3-B1-C1], [A1-B2-C1], ..., [A2-B2-C2], [A3-B2-C2]. If a design contains both within-subjects and between-subjects factors, the within-subjects factors are listed first. In the one within-subjects, one between-subjects design, factor A is, thus, the within-subjects factor and factor B the between-subjects factor.
Copyright © 2023 Rainer Goebel. All rights reserved.