BrainVoyager v23.0
Image Annotator
The Image Annotator window can be used to annotate images of Image Cells as well as images stored in the Image Reporter; since a series of images in the image reporter can be converted into an animation, annotated images, thus, can also become annotated frames in movies placed in Aniimation Cells. In notebooks, the Image Annotator can be invoked by CTRL-Clicking the image in an image cell.
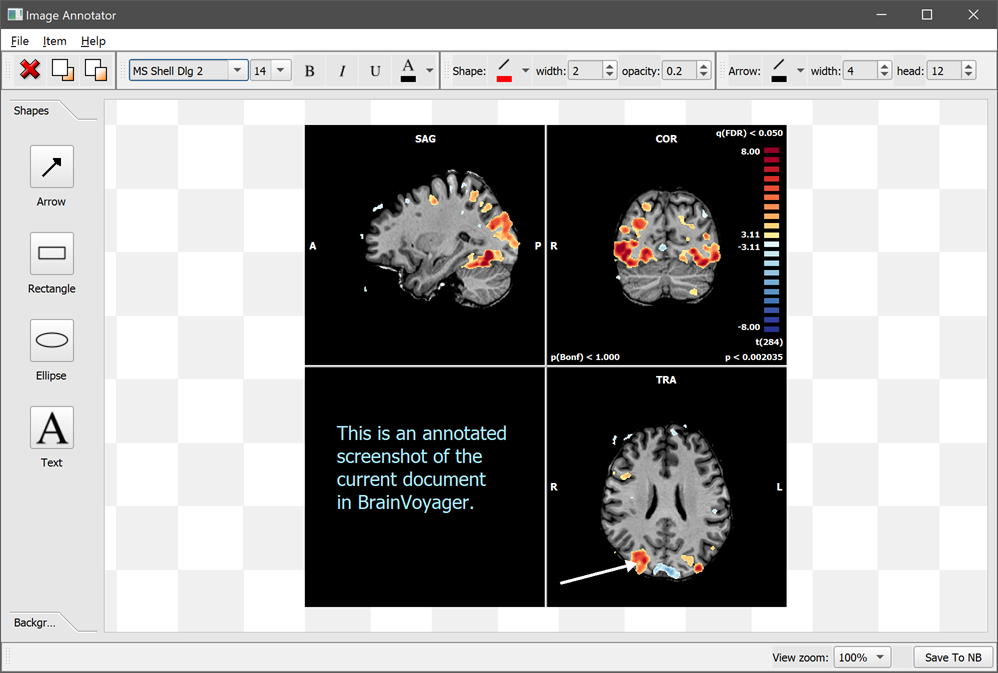
The screenshot abve shows the appearing Image Annotator window with the image that was clicked in the notebook's image cell. The image shows already animations that had been added earlier to this image, i.e. a text and an arrow item. Note that annotations are automatically stored in vector format as overlays inside the notebook and they are thus immediately available for further edits. New annotation elements can be added by clicking on the Arrow, Rectangle, Ellipse or Text item in the Items toolbar on the left side. After clicking an item, the annotator switches in item drawing mode until the item has been added or the process cancelled.
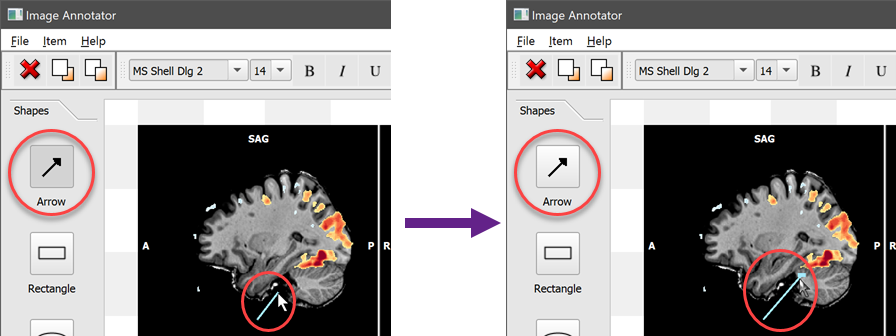
As an example, the screenshots above shows the state when the Arrow item in the toolbar has been selected (red circle on left side in left panel); a new arrow can now be drawn on the image by clicking down first where the end point of the arrow should be; then the mouse is dragged (moving while holding down the left mouse button) to the point where the arrow head should be drawn. The screenshot on the left side was made after the clicking at the first (start) position has been made and when the mouse was in the middle of dragging to the target position (see region highlighted with red circle in image). After releasing the mouse, drawing mode completes (see toolbar in right screenshot) and the full arrow (with its head) is shown (see red circle on image in right panel).
Editing Item Properties
The position, length and orientation of the drawn arrow can be adjusted further by clicking on the item, which activates item selected mode. If selected, an item can be dragged (without releasing the mouse first) to another location directly. In case other properties should be changed, the mouse button needs to be released; if hit, the item selection will be indicated by additional elements, such as handles for shapes and a stippled rectangle around a selected text item. To change the length and orientation of the arrow item, click one of the two displayed handles at the end or head of the arrow. Dragging the mouse (left button pressed down) when having hit a handle will move the respective anchor of the arrow but not the second anchor resulting in adjustments of the arrow length and orientation. Position and shape properties of all items can be similarly changed directly in the image view. Note that a selected item can be deleted by clicking the DELETE button.
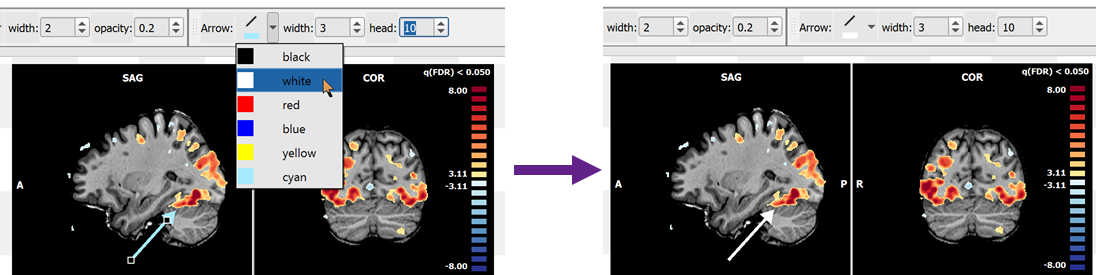
If an item is selected, additional properties can be changed by using the respective fields in the main toolbar of the image annotator window. Relevant property fields will be filled with the values corresponding to the respective item and they can be changed by manipulationg the fields. The left side of the screenshot above shows the state of the Arrow section of the toolbar after selecting the previously added arrow (see two handles at the end and the arrow head). The three arrow-related fields display the current color, pen width and size of the arrow head; the screenshot was taken after adjusting the pen width and arrow head size and just before changing the color from cyan to white. The resulting view of the arrow is shown on the right side.
Saving the Annotated Image
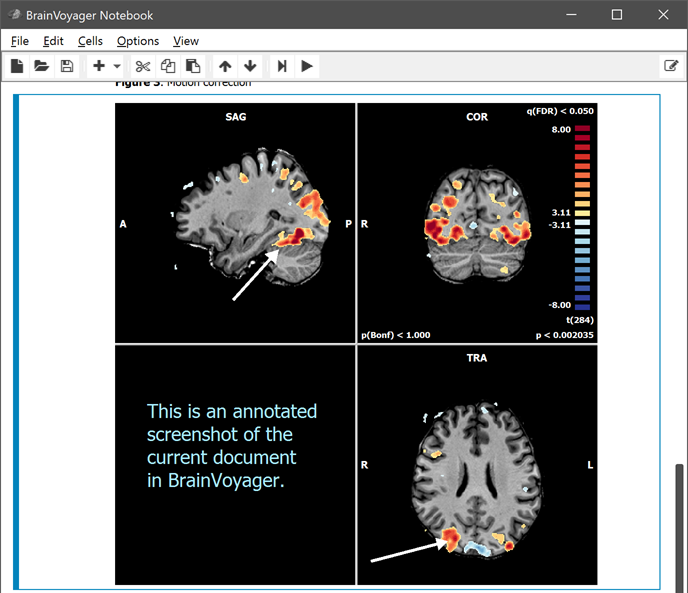
When all annotations have been completed, the Save To NB button can be clicked, which will close the Image Annotator and embed the updated annotated image in the original image cell of the notebook. The screenshot below shows, for example, the edited image in the annotator above in the notebook. In case one wants not to update the image annotations, the annotator window can be simply closed by the standard window Close icon in the title bar. In case the Image Annotator is used from the Image Reporter, the Save to IR button needs to be clicked to replace the original image with the annotated image.
The image shown in the notebook is a regular image, i.e. the annotation items are rendered as pixmaps and drawn into the image pixels. The ntoebook saves, however, also the vector definitions of the annotated items as well as the original source image without annotations to enable iterative annotation editing.
Note. Items that are drqwn in full or in part outside the image will be clipped when embedding the annotated image in the notebook. The areas outside can however be used e.g. for taking notes. It is planned for a future release to include regions around the image.
Cropping an Image
The rectangle item can be used like any other item to annotate an image. It also can also be used to cropan image, i.e. to remove unwanted parts outside a core rectangle. This may be useful after shooting the entire BV program window (or desktop window).
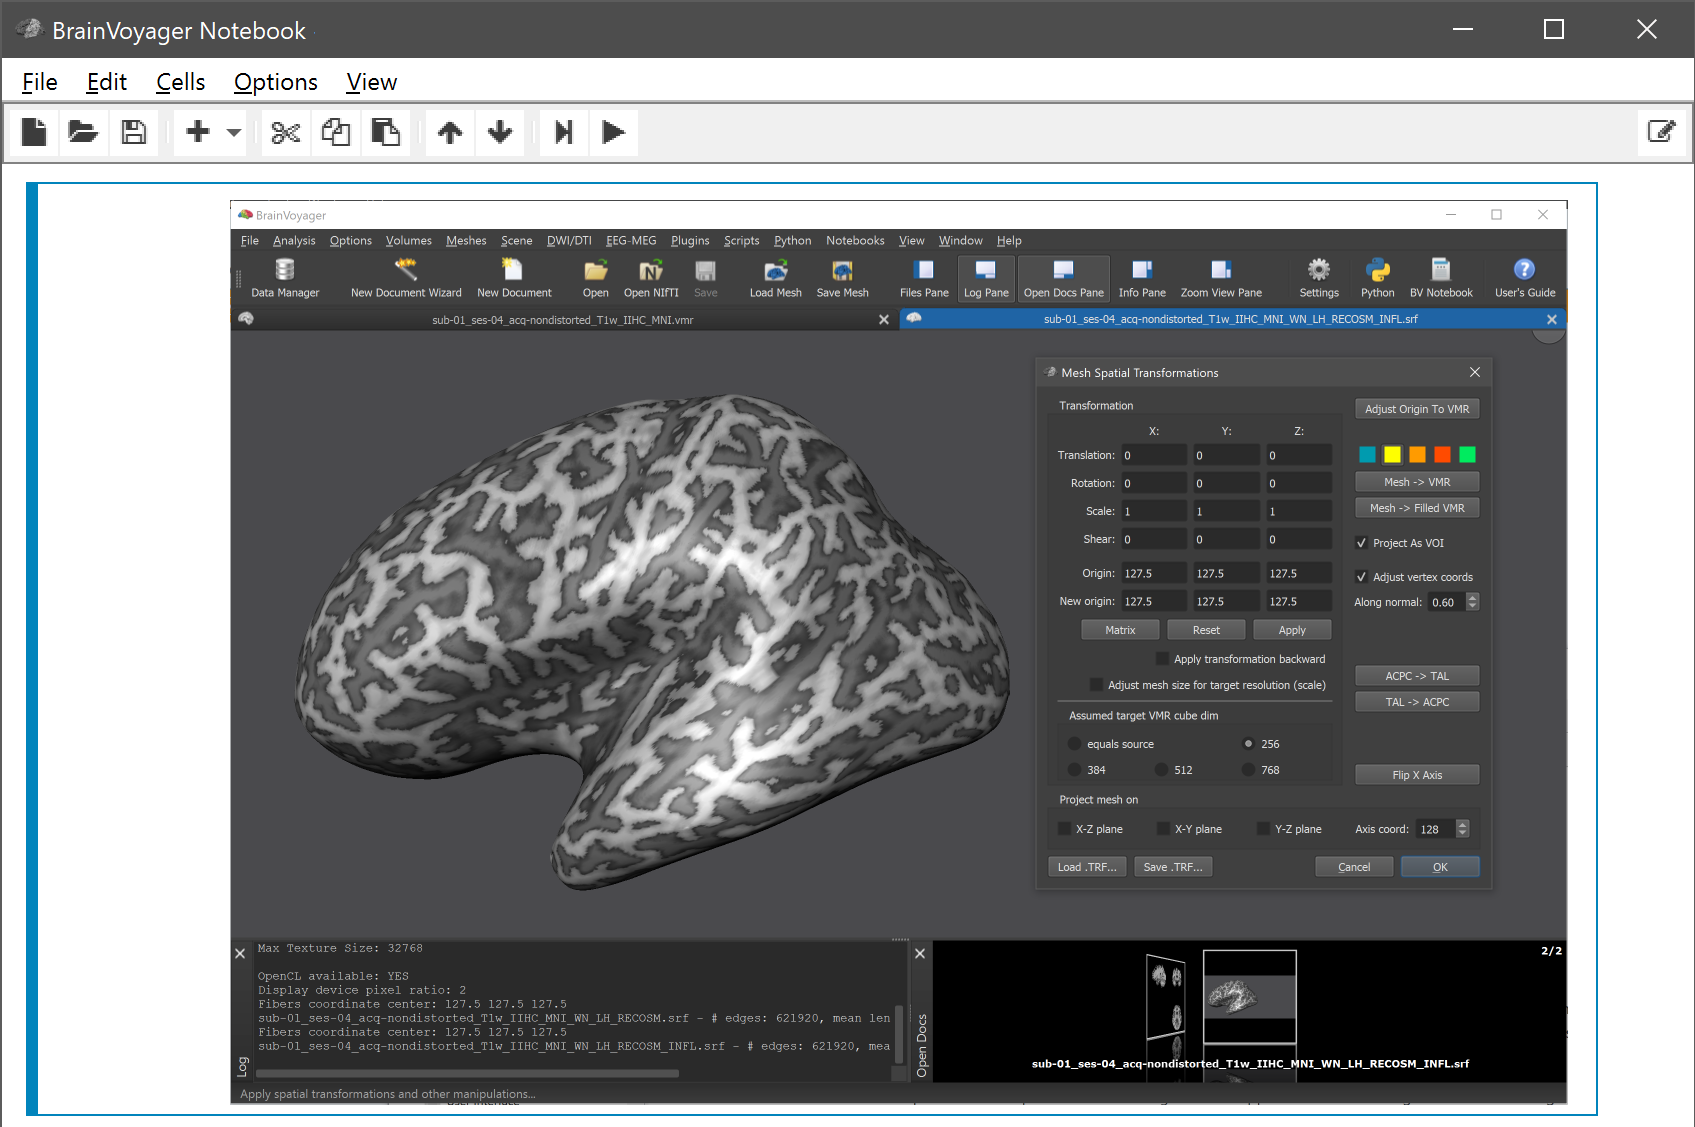
In the screenshot above, for example, the goal is to show a cortex mesh next to the Mesh Spatial Transformation dialog. While each item could be easily grabbed separately (the mesh using CTRL-C, the dialog using CTRL-G keyboard shortcut), this would not capture them in one image. It is, however, not the goal to include other parts of the user interface. To remove those, the Image Annotator can be invoked (CTRL-click on image) and a crop operation can be performed using the Rectangle item.
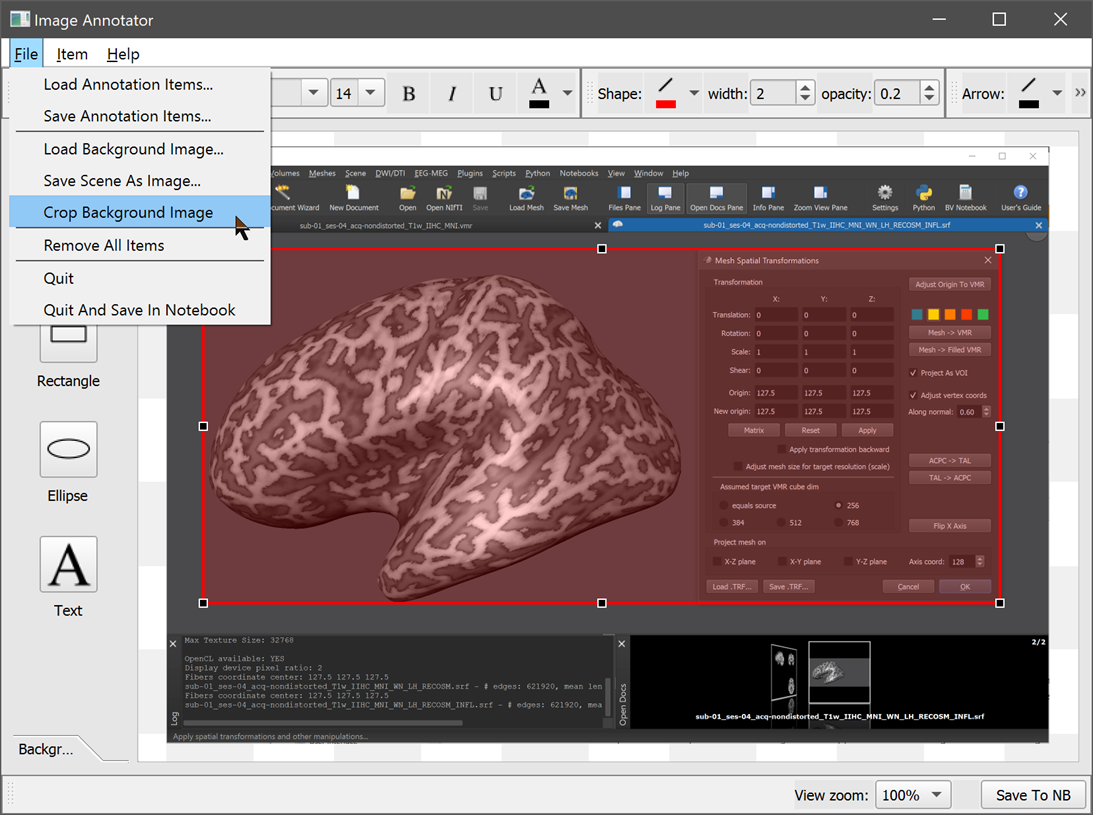
The screenshot above shows the invoked Image Annotator with a red rectangle item drawn over the desired part of the original image. In order to crop the image, the rectangle needs to be selected as indicated by the 8 handles drawn around the item. If selected, the Crop Background Image item in the File menu will be enabled and it can be clicked to perform the cropping operation (see screenshot above). The resulting image can be saved back to the notebook by clicking the Save To NB button.
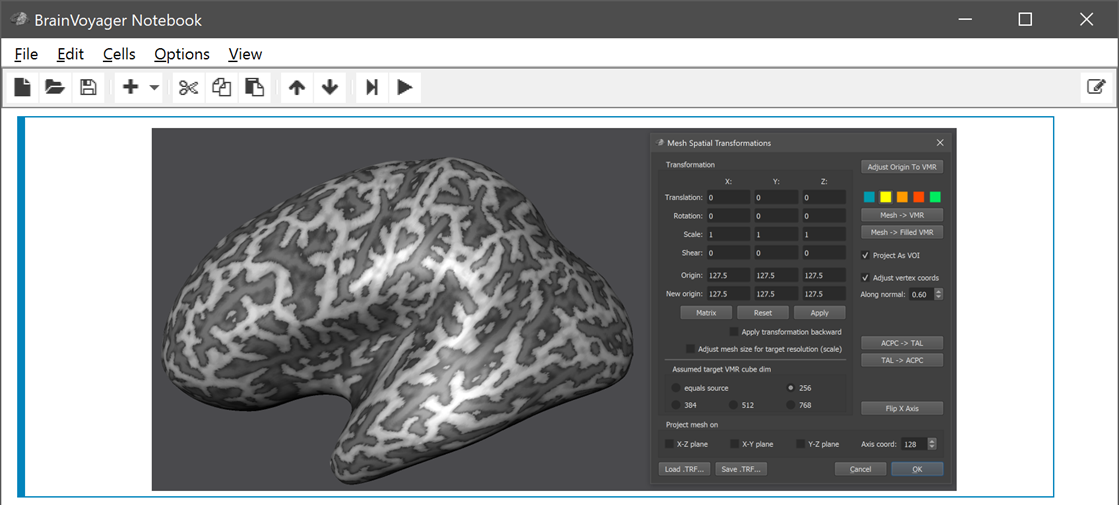
The screenshot above shows the updated image cell in the notebook, now including only the desired part of the original screenshot. By re-entering Image Annotator, annotations can be added to this (cropped) image as described above.
Copyright © 2023 Rainer Goebel. All rights reserved.