BrainVoyager v23.0
Animation Cells
Animation cells can be inserted in several ways. From the notebook window, an animation cell can be added before or after the current cell using the Insert Animation Cell Above or Insert Animation Cell Below item in the Cells menu. More conveniently, an animation cell can be added after the current cell by selecting Animation Cell in the popup on the right side of the + icon in the toolbar. The added animation cell will show a placeholder animation. In order to replace it with an animation on disk, double click the palcehoder animation and select the desired animation in the appearing Animation Propertiese dialog. Note that you can embed only WebP (pronounced weppy) animations with the extension '.webp', which refers to a relatively new image and image animation format developed by Google.
The animation above is an embedded .webp file and should run on all platforms when using BrainVoyager's integrated help engine (Help > User's Guide or User's Guide icon). It should also work on most browsers when using the 'WebHelp' version of the User's Guide in a web browsere since the .webp format gains increasing support (Chromium, Windows Edge, Firefox, Safari in macOS Big Sur).
Another very useful possibility to add animation cells to a notebook is by sending an animation from BrainVoyager's Animation Player by clicking its Send to NB button. Besides loading .webp animations, the animation player also receives .webp animations that are generated from BrainVoyager's Image Reporter window.
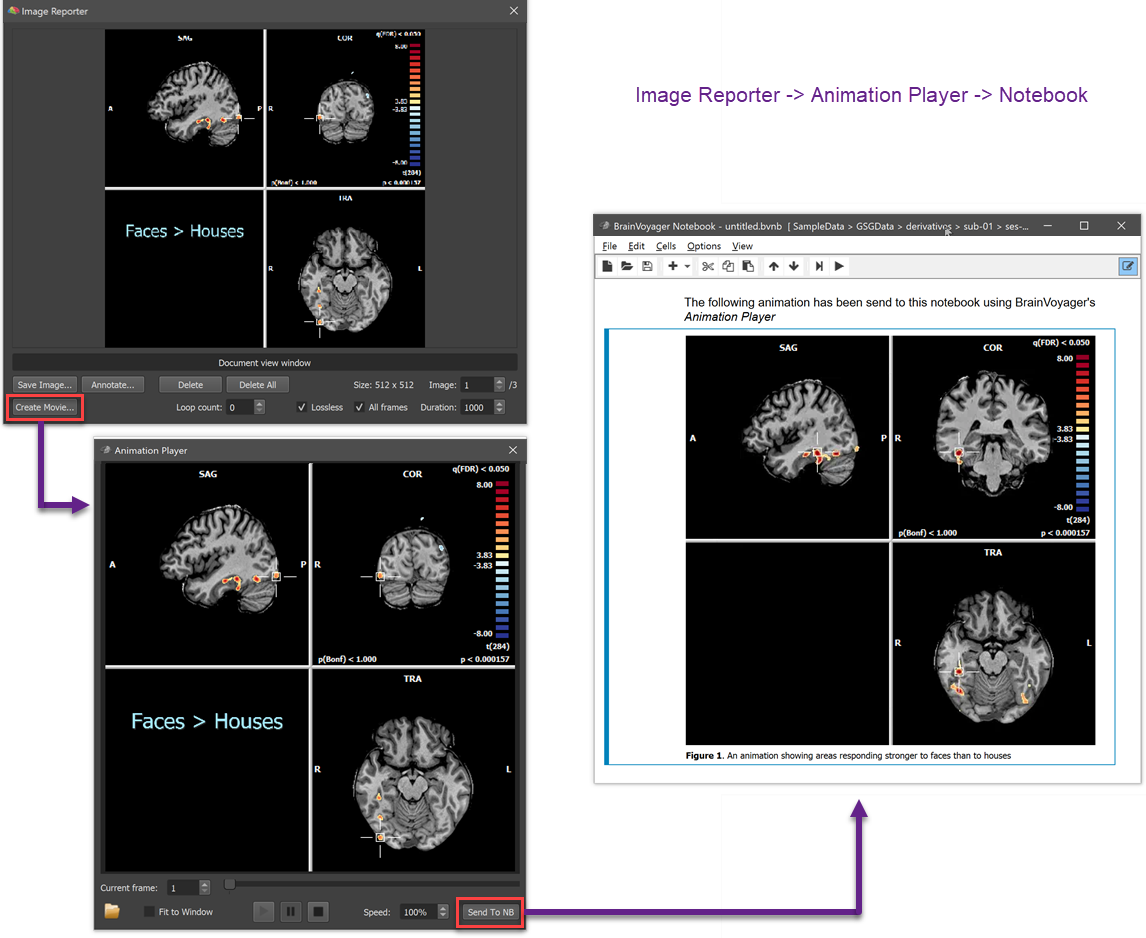
The screenshot above highlights the workflow that can be used to create and embed animations in a notebook. The Image Reporter (left upper panel) is used to accumulate images that become frames of a movie, e.g. by using the CTRL-SHIFT-C snapshot to repeatedly capture the adjusted view of the current document. The integrated Image Annotator can be used to annotate individual frames. The webp animation can then be created using the Create Movie button (see red rectangle on left side). This will use all assembled frames together with specified information about frame duration and number of loops to create the webp animation. After providing a location and name for the movie on disk, it will be opened and played automatically in the Animation Player. In case that a notebook is open, the webp animation can be send to the notebook by clicking the Send To NB button (see red rectangle at the bottom). The panel on the right side shows the updated notebook with the sent animation in an inserted animation cell.
The animation of a animation cell and additional items such as an optional caption can be customized by opening the Edit Animation Properties dialog that can be invoked by double-clicking (or SHIFT-clicking) the animation.
Note. WebP animations are stored inside the notebook allowing easy sharing without needing the external animation files. To not create unnecessary large notebooks, animations should be added with care and in a reasonable size.
Copyright © 2023 Rainer Goebel. All rights reserved.