BrainVoyager v23.0
Installing and Enabling Python
Since BrainVoyager 20.0 Python plays an important role for the software: Besides being the primary interpreted language (next to JavaScript) to enable users to writie cross-platform analysis scripts as well as to write code for new functionality, Python is also necessary for executing the code cells in BrainVoyager notebooks. Furthermore, Python is used in the background to run the high-resolution deep neural network (DNN) based cortex segmentation tool. The trained 'Tiramisu' DNN has been implemented using Google's TensorFlow machine learning platform, whiich is also accessed using its Python interface.
BrainVoyager is based on a standard (CPython) Python runtime environment as it is available directly from Python's home page Python.org or from distributions that focus on data science such as Anaconda. Virtual environments of a minimal installation of Anaconda, called Miniconda, are recommended for use with BrainVoyager (see below). To enhance flexibility, BrainVoyager embeds Python in its user interface via a plugin library that is only launched when needed the first time. With this approach BrainVoyager lets you chose any (compatible) Python environment on your disk after starting BrainVoyager. The selected Python version and its location on disk is then stored in BV's permanent settings file but you can switch to another Python on disk at any moment in time (but before Python is used the first time in a session since switching to a new Python is blocked until the program is restarted). Since version 22.2, BrainVoyager supports multiple Python versions (only Python 3.6 was supported in earlier releases). The latest version, BrainVoyager 23.0, supports Python 3.8 and 3.10 (recommended). The recommended Miniconda installation (see below) provides powerful means to setup environments for multiple Python versions in an elegant way. Using environments makes it possible, for example, to use specific sets of modules potentially with different Python versions next to each other. This allows to install a Python environment for BrainVoyager without affecting any other (system) Python installation that may require a different Python version or specific versions of Python modules. For a supported Python version it is, of course, possible to install other (neuroimaging) Python modules (e.g. 'nibabel') that one wants to use in addition to BrainVoyager's Python programming interface.
While one could go with the Anaconda distribution coming with hundreds of Python modules, we recommend Miniconda since it starts with a minimal Python installation to which one can add just the needed packages for a specific purpose. Miniconda plays also nice with already installed Python versions: You do not need to uninstall other Python installations or packages in order to use conda, which is the package and environment manager of Miniconda. Even if you already have a system Python or another Python installation (e.g. from Python.org), you do not need to uninstall, remove, or change any of them before using conda. Another advantage to use a miniconda environment is that you can provide a specific name (see below) that is auto-detected by BrainVoyager.
Python Installation Using Miniconda
In case you have installed BrainVoyager 23 and you have already an installed miniconda3 environment (e.g. env_bv_py38 or env_bv_py310) from BrainVoyager 22.4, you need to install only 'PySide6' to use Python in BrainVoyager 23 (see step 3 'Install PySide6' below). In case you install a miniconda3 environment for BrainVoyager for the first time (or after removing an old miniconda3 with its environments), here are the recommended steps to setup Python using Miniconda:
1. Install Miniconda
If not yet installed, download the latest 3.x (not 2.7) version from the Miniconda page. Make sure that you download the 64-bit version for your operating system:
- Windows : In the 'Windows' platform section, click the 'Miniconda3 Windows 64-bit' link that will download the file '
Miniconda3-latest-Windows-x86_64.exe' to your disk. Double-click the downloaded file to launch the installer and follow the displayed instructions. It is strongly recommended to install into the user's home folder ('Just for me' option) instead of in a global folder ('For all users' option). If Miniconda is installed in the user home folder, everything should be placed in the 'C:\Users\[user]\Miniconda3' folder (with '[user]' replaced with your user name). - macOS : In the 'macOS' platform section, you will find installers for both 64-bit Intel and arm64 Apple Silicon ('Apple M1') installers. Despite Rosetta2 Intel emulation on arm64 Apple computers, it is strongly recommended to use the package corresponding to your Apple architecture (as well as the corresponding download link of the BrainVoyager 23 version). Click the '
Miniconda3 macOS Intel x86 64-bit pkg' for Intel or 'Miniconda3 macOS Apple M1 64-bit pkg' for Apple Silicon to download the respective installer to disk. Double-click the downloaded file to launceh the installer and follow the displayed instructions. It is recommended to install into the user's home folder ('Just for me' option) instead of in a global folder ('For all users' option). If Miniconda is installed in the user home folder, everything should be placed in the '~/miniconda3' folder. - Linux . In the 'Linux Installers' section, click on 'Miniconda3 Linux 64-bit' that will download '
Miniconda3-latest-Linux-x86_64.sh' to your disk. Run the downloaded shell script and follow the displayed instructions. When asking to confirm or provide a location for miniconda, accept the recommended location in the user home folder, i.e. '/home/[user]/miniconda3'. When the installer asks 'Do you wish the installer to initialize Miniconda3 by running conda init?' we recommend to answer 'yes', which will change the user's login shell files to automatically set the base environment of miniconda if you open a new Terminal window (shell). If you do not want to change login shell files, you can say 'no' and can activate later by running: 'eval "$(/home/[user]/miniconda3/bin/conda shell.bash hook)'; note that you need to change 'bash' to your shell if you are not using bash shell. To later turn on (after activation) the convenient auto-activation of the miniconda3 base environment when launching a Terminal, execute'conda init'.
2. Create a Python Environment for BV
Note that the installed miniconda3 base Python version may be newer (likely 3.11 or higher) than the versions (3.8, 3.10) currently supported by BrainVoyager. This is no problem since miniconda allows us to create environments using different versions of Python than in the base environment. Now open a Terminal window (macOS, Linux) or open the 'Anaconda Prompt (Miniconda3)' Prompt from the Windows Start menu and type the following from the active base environment:
1: > conda update conda
This command is executed just to ensure that the package manager 'conda' is up-to-data. Now we create an environment containing Python 3.10 (or 3.8) as well as basic data science libraries required by BrainVoyager:
2: > conda create -n env_bv_py310 python=3.10 numpy scipy matplotlib
Note that the name of the created environment is env_bv_py310 (a Python 3.10 environment for use with BrainVoyager) that will be automatically detected when enabling Python in BrainVoyager (see below).
On some platforms, errors with the Intel 'MKL' library have been reported when using numpy. To avoid such issues, you can add 'nomkl', which will let numpy and other packages use 'openblas' instead of MKL preventing error messages when using numpy with BrainVoyager:
2b: > conda create -n env_bv_py310 python=3.10 nomkl numpy scipy matplotlib
Note that you can even do this after having created the environment with MKL (default setup of miniconda) in case of error reports by just submitting the command 'conda install nomkl' after activating the respective environment.
3. Install PySide6
BrainVoyager 23 uses PySide6 to embed Python in BrainVoyager requiring to install the 'PySide6' module. This module also provides extensive GUI (and other) functionality of the 'Qt' libraries that can be used from BrainVoyager or from pure Python (standalone) programs. In case you use an environment that has already an older PySide6 version installed, you do not need to deinstall PySide6 since the new installation will automatically remove the old version. Before installing PySide6 into a specific environment, the created (or existing) miniconda3 environment needs to be activated:
3: > conda activate env_bv_py310
If you use a minicona3 environment already for some time, it may be useful to update the Python installer 'pip' that we use below by entering > python -m pip install --upgrade pip. Now we can install PySide6:
4: > pip install PySide6==6.5.2
Note that the provided PySide6 version is important and it needs to match the version of the Qt libs used by BrainVoyager version. For BrainVoyager 23.0, the '6.5.2' version must be used. Also note that you need to write two equal signs ('=='), not just one to specify the desired version. If you want to save some disk space you can optionally also write:
4b: 'pip install PySide6_Essentials==6.5.2', which installs functionality that is sufficient for using BrainVoyager plus the most important features of the 'Qt' tools.
At this point the installed Python 3.10 environment can be already used from BrainVoyager. To also prepare Python to run the DNN Segmentation tool, installation of TensorFlow is needed.
3. Add TensorFlow to Enable DNN Segmentator
Note that the conda command above for creation of a Python 3.10 environment did not request specific package versions for numpy, scipy and matplotlib. The reason is that this avoids the risk of package conflicts and for BrainVoyager the latest available versions of these packages should work fine. In previous versions of this document, specific versions of these modules were requested for a specific TensorFlow 2 version, e.g.:
( > conda create -n env_bv_py38 python=3.8 numpy=1.20 scipy=1.4 matplotlib=3.3 )
This way to create the environment is, however, no longer recommended because the specific package versions might no longer be available (or they create conflicts) in the conda repositories. Furthermore, more recent versions of TensorFlow (2.2 and higher) resolve potential conflicts automatically.
To install TensorFlow (TF) into our created Python environment, we first need to activate it:
4: > conda activate env_bv_py310
With the activated environment, commands like 'python' or 'pip' will use the correct (here: 3.10) Python version. We will use the standard Python package installerpip to install TensorFlow:
6: > python -m pip install tensorflow
You may also specify a specific version of Tensorflow, e.g. to install version 2.8, you would write tensorflow==2.8 in the line above. The last Python module to add in the environment is nibabel, which is used in the DNN Segmentation code to read and write NIfTI files from Python:
7: > python -m pip install nibabel
While this completes the necessary steps for BrainVoyager, you can move on to test whether everything works as expected, i.e. whether the created environment uses Python 3.10 (or 3.8, depending on the used Python version) and imports essential modules without issues. To launch Python from the activated 'env_bv_py310' environment, type 'python' (plus 'Return' key) in the Terminal. You should get a message telling you that you are running a Python 3.10.x version and then a standard Python prompt '>>>' ready to receive your Python commands. To exit the Python interpreter type 'exit()' followed by 'Return'. Note that you can leave the 'env_bv_py310' environment by entering 'conda deactivate' which will bring you back to the base environment. While you can use the created environment from a Terminal, this is not required for BrainVoyager, which accesses it without the need of issuing activation commands.
Note that with older versions of TensorFlow, GPU support was not automatically installed. When using newer versions (e.g. 2.10), GPU support is automatically installed if the appropriate GPU drivers are installed on the system. For details consult the official TensorFlow documentation. A useful blog post to install TensorFlow 2.6 with GPU support on Windows can be found here. For Apple Silicon platforms, the CPU version is used but it comes with very high performance. There is some work to enable Apple's GPU for TensorFlow, but there are issues at present and we thus do not yet recommend using GPU-based Metal versions of TensorFlow on Apple computers.
Selecting a Python Version in BrainVoyager
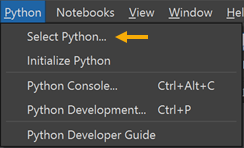
After starting BrainVoyager, click the Select Python item in the Python menu.
This will open the Select Python On Disk dialog:
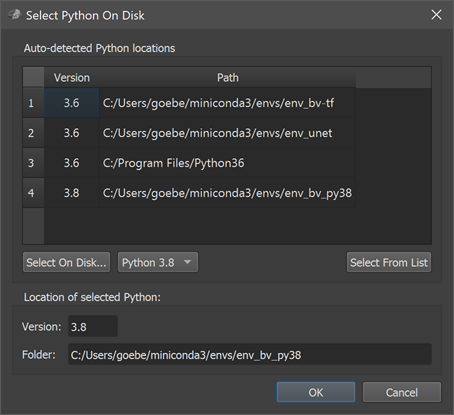
The section Auto-detected Python locations lists all Python versions that are compatible with the current BrainVoyager version (e.g. Python 3.8 and 3.10 for BrainVoyager 23.0) and that are found on disk using a heuristic search in standard locations, including Miniconda environments, the Python.org Python and the version installed by the operating system on Linux. After a standard setup as described above, you should find here the env_bv_py310 Miniconda environment created above as well as other environments you might have created. In the example snapshot of the dialog above, three Python 3.6 installations were detected (two in Miniconda environments and a Python.org installation), as well as the Python 3.8 version in the environment created above (env_bv_py38).
The Python version currently selected (if any) is shown in the Location of selected Python field with the the version in the Version field and the folder on disk in the Folder field. To select another Python environment / installation, simply select one in the list of auto-detected Python versions and then click the Select From List button. The newly selected Python version will then replace the previously selected Pythin in the Version and Folder text fields in the Location of selected Python section. To accept the newly selected version, click the dialog's OK button.
In case the Miniconda Python 3.10 env_bv_py310 environment has been created as described above, BrainVoyager 23.0 will select this version as default on first launch. If you have a Python 3.8 / 3.10 on disk that was not detected automatically, you can also use the Select On Disk button to specify any other compatible version by selecting its main folder on disk. Before clicking on Select On Disk, the version you want to specify on disk needs to be selected in the Python version selection box (default selection is Python 3.10). Note that the program ensures that you select a valid Python installation / environment by restricting the file selection to the core Python library in the respective Python folder. After selecting the desired version in the appearing Open File dialog, the version and folder of the selected Python in the respective entries of the Location of selected Python section.
When clicking the OK button of the Select Python on Disk dialog. the chosen Python versiony will be permanently kept so you only need to go back to this dialog in case you want to switch to another Python version. When opening the Python IDE or when opening a BrainVoyager notebook, the selected Python version will automatically be embedded and it will then be available throughout a BrainVoyager session. You can also test whether the selected Python version can be initialized successfully by clicking the Initialize Python item in the Python menu. The Python developer window also shows the currently embedded Python version in the bottom toolbar.
Recommended test. To test whether BrainVoyager uses the specified Python, you can open and run the 'Test Python' notebook that is available in the Notebooks menu (the notebook can also be opened from its location, which is in 'Documents/BrainVoyager/Notebooks' folder after BrainVoyager installation).
Note. Make sure that the Pyton version you select contains the minimal set of modules as described above. If, for example, the 'numpy' and 'matplotlib' librarires are not installed, the Python cells in BrainVoyager notebooks will print an error message since these libraries are assumed to be present for provided default functionality (e.g. embedding of matplotlib images). When using the DNN Segmentator, TensorFlow must be properly installed, otherwise an error message will be printed in the Python Console panel.
Note. After a Python version has been selected and initialized (and used), you can no longer switch to another Python version in the current BrainVoyager session. If you clcik on the Select Pyton item in the Python menu, the program will show a message that Python is already in use and can not be changed. If you want to use another Python version, you must first close BrainVoyager and relaunch it. You can then open again the Select Python On Disk dialog as long as Python has not been used in a script or notebook.
Copyright © 2023 Rainer Goebel. All rights reserved.