BrainVoyager v23.0
Exporting Movies
When a BrainVoyager (.bmv) movie has been defined, one may want to convert it to a standard movie such as a Quicktime movie or Windows Media file. On some operating systems, BrainVoyager uses an embedded FFMPEG version to directly create a .mp4 movie. Another option that is always available allows to save a series of rendered frame images, which can be "glued together" to a standard movie with many external tools, including a standalone executable of the mentioned FFMPEG software. After turning on one of the options, the BrainVoyager movie needs to be started as usual by clicking the Play button in the Player pane. Note that any panels and text displayed in the 3D Viewer window will be hidden when playing the movie and they will thus also not appear in the rendered output movie or sequence of exported image files. The 3D axis of the 3D Viewer is shown as specified before running the movie and can, thus, also be hidden if desired.
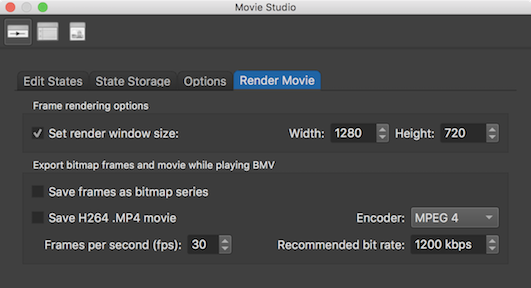
To export every rendered frame (state and inter-state frames) as a series of PNG bitmap files, check the Save frames as bitmap series option in the Export bitmap frames and movie while playing BMV field in the Render Movie tab of the Movie Studio window. In this tab, it is also possible to adjust the size of the rendered frames, which is set to a default value of 1280 x 720 (16:9) resolution. The value entered here will also be used to resize the 3D Viewer window used by Movie Studio. The exported rendered frames will be put in a sub-folder named like the BMV movie file. Furthermore, the files saved to that folder will be differentiated by 5 digit zero-padded frame numbers. If, for example, the BranVoyager movie file is named "MyMovie.bmv", a folder "MyMovie" will be created containing the bitmaps "MyMovie-00001.png", "MyMovie-00002.png" and so on.
Note that one can use the previously described option to increase the number of frames by using the Multiply button in the Options tab to scale the number of frames with respect to the number of "frames-per-second" set in the external program. If the time between two successive states should be as long as 1 second in the final movie, make sure that the number of inter-frames between states matches the number of frames-per-second specified in the external movie tool.
In order to use the direct movie export, turn on the Save H264 .MP4 movie option, if available. When using the direct movie export, the fps value entered in the Frames per second (fbs) field will be written to the metadata of the generated movie file.
Copyright © 2023 Rainer Goebel. All rights reserved.