BrainVoyager v23.0
Anonymization and Defacing
It is important to ensure data privacy when storing and anayzing data. Even when the data is analyzed on a single computer, data privacy should be ensured in case the computer is lost by using data encryption. When sharing data within and outside a lab, it is also important to ensure that data is anonymized. Using NIfTI files to share data is beneficial since its short header makes it rather easy to ensure that data is anonymized. It might be, however, required in some situations, to share the original DICOM files with colleagues. In that case it is usually required to share anonymized data (only a specified and limited number of people, e.g. the PI, might have the rights to access non-anonymized data in special privacy-sensitive folders). For the case that DICOM files need to be shared, BrainVoyager offers the possibility to remove privacy-sensitive information from DICOM files.
Anonymizing DICOM Files
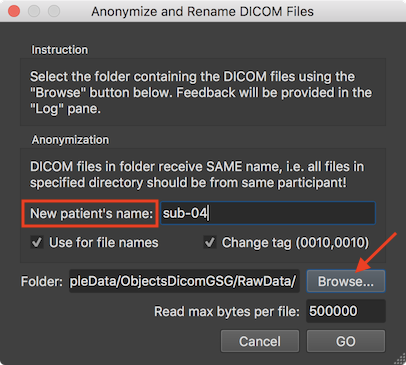
To anonymize DICOM files, the Anonymize and Rename DICOM Files dialog can be used that can be invoked using the Anonymize DICOM Files item in the Files menu. The dialog provides instructions in the Instruction field and indicates that data in the selected folder should be from the same subject in the Anonymization field. The field in the DICOM file storing the name of the participant will be replaced by the name entered in the New Patient's name filed. In the screenshot above the BIDS compatible name "sub-04" has been chosen. The entered name will also be the first substring of the rewritten (renamed) DICOM files. After clicking the GO button, each file in the folder is analyzed whether iti is a DICOM file, which are then changed and renamed. The Log tab shows the progress during the operation. The screenshot below, for example, shows some DICOM files in the selected folder and it can be seen that the renamed files start with the provided patient name followed by the value found in the DICOMs series, volume and file number (e.g. "sub-04-0003-0221-05501.dcm").

Note. The anonymization process does currently not change other information than the "patient name" field. It is planned to extent the anonymization to other fields such as age and weight in the subsequent minor release. If you need a stronger anonymization, it is recommended to use external anonymization tools until the tool in BrainVoyager has been updated.
Note. The process changing informaton in DICOM files and changing the DICOM names to an anonymized and better structured form for subsequent document creation does NOT change the actual image data stored in the DICOM files.
Note. The anonymization tool can be used instead of the Rename DICOM Files tool since the anonymization tool performs the same file renaming operation except that the patient name in the renamed files will not be the one from the original DICOM file but the name stored in the anonymized DICOM files, i.e. the name entered in the Anonymize and Rename DICOM Files dialog.
Defacing 3D Anatomical Data
While anonymization of DICOM files helps to ensure data privacy, the identity of participants may be revealed by reconstructing the skin surface from 3D anatomical data. Since BrainVoyager 21 this can be prevented by "defacing" the head of a participant. This tool can be applied directly to DICOM files or to VMR documents created from scanner data (that can be then also saved as NIfTI files). In order to deface original scanner data, BrainVoyager performs a temporary MNI transformation creating a 12-parameter affine spatial transformation matrix that is applied backwards to transform a defacing mask defined in MNI space into the data’s original (native) space where it is finally applied. This procedure ensures that no interpolation of the original voxel intensities is introduced, i.e. only the voxels inside the defacing mask are set to 0 while other voxels are untouched. In case of defacing DICOM files, the masked data is saved back - slice by slice - to the original DICOM files.
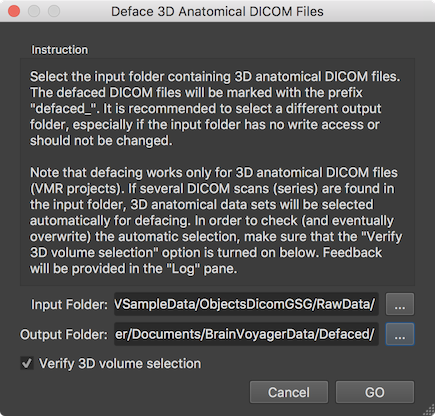
Defacing can be performed for DICOM files using the Deface 3D Anatomical DICOM Files dialog (see screenshot above) that can be invoked using the Deface DICOM Files item in the File menu. The dialog contains an Instruction field that suggests using a different directory for the Output folder field than selected in the Input folder field. The text also explains that it will apply the defacing to any document that is recognized as a 3D anatomical DICOM series and that one can control the selection of the series to be processed by checking the Verify 3D volume selection option (turned on as default). In the screenshot above a "RawData" folder has been selected that contains three DICOM series but only one of them represents a 3D anatomical data set. Also a different output folder has been selected to keep the folder with the raw scanning files cleean.
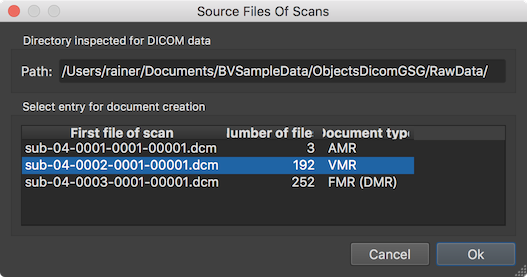
After clicking the GO button, the Source Files Of Scans dialog will appear since the Verify 3D volume selection option has been checked allowing to verify the detection of 3D anatomical datasets. In the example case, the program has detected and automatically selected the single VMR document correctly. After clicking OK, the program will create the document, transform it to MNI space in order to get a TRF matrix that is applied backwards to the MNI-space defacing mask. Note that the defacing mask in MNI space is located in the standard "MNITemplates" folder inside the BrainVoyager folder, i.e. the deface mask VMR can be inspected and modified if desired. The result of masking the created VMR document is then applied to the slices (files) of the DICOM data without changing the original DICOM header. Besides setting the values inside the mask to zero, the image data (voxel intensity values) are not changed by this process.
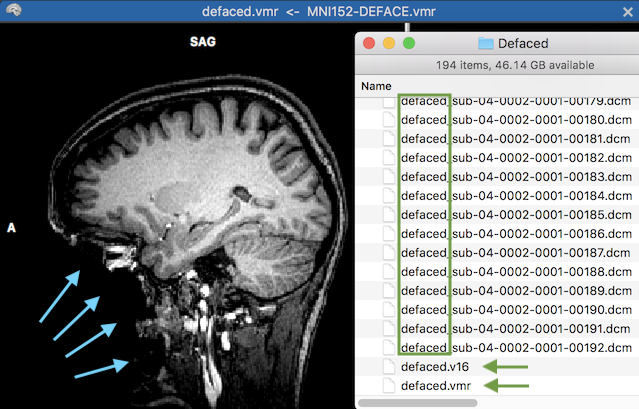
The screenshot above shows the resulting VMR document. The blue arrows on the left side highlight the area that has been removed by the defacing mask in the native space of the VMR document. The green rectangle on the right side highlight the first substring of the produced DICOM files written to the specified "Defaced" folder. The two green arrows show the defaced 3D anatomical data as a defaced BrainVoyager VMR (8-bit data) and V16 (16-bit) data document. If not needed, these files can be removed (they are added for convenience).
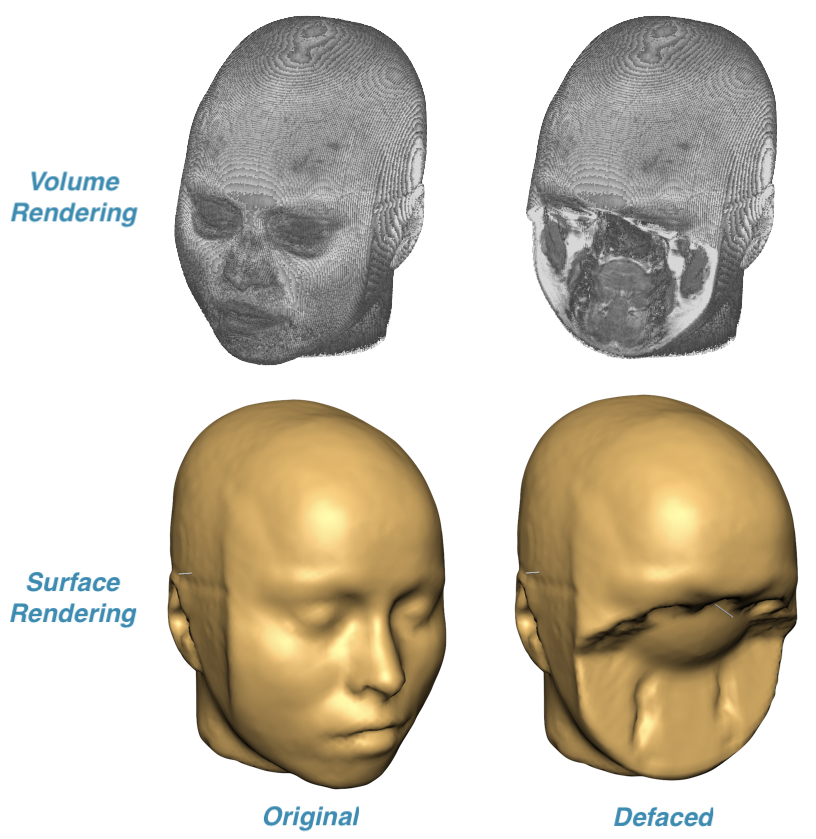
To demonstrate the result of applying a defacing mask, volume or surface rendering can be used. The upper row in the screenshot above shows the result of volume rendering of a VMR document created before and after DICOM files had been defaced while the lower row shows the same VMR data visualized using surface rendering. These visualizations clearly show that the face information (eyes, mouth, nose etc.) critical for person identificaton has been successfully removed.
When one wants to deface 3D anatomical VMR documents but DICOM files need not to be changed, one can also use the Deface VMR item in the File menu. This function performs the same operation as described above that is applied directly (i.e. no dialog is shown) to the currently active VMR document in the multi-document area. Note that the VMR document is expected to be in native space, i.e. the result of a document creation process.
In case head information outside the brain is not needed for sharing VMR or corresponding NIfTI data files, it is recommended to share the data after application of the intensity inhomogeneity preprocessing tool that includes as default also a skull stripping step. The resulting "_IIHC.vmr" data contains only brain tissue and the identification of the face of the participant will not be possible.
Copyright © 2023 Rainer Goebel. All rights reserved.