BrainVoyager v23.0
From States To Movies
Movie Studio distinguishes between state frames (or simply "states") and inter-state frames. While state frames are "keyframes" defined by the user, inter-frames are automatically calculated using interpolation.This ensures smooth transitions between states forming the basis of an extended animation. The shortest possible movie, thus, requires the specification of two states. Movies are created by adding the information contained in a currently rendered scene in the 3D Viewer as a "state" to the movie.
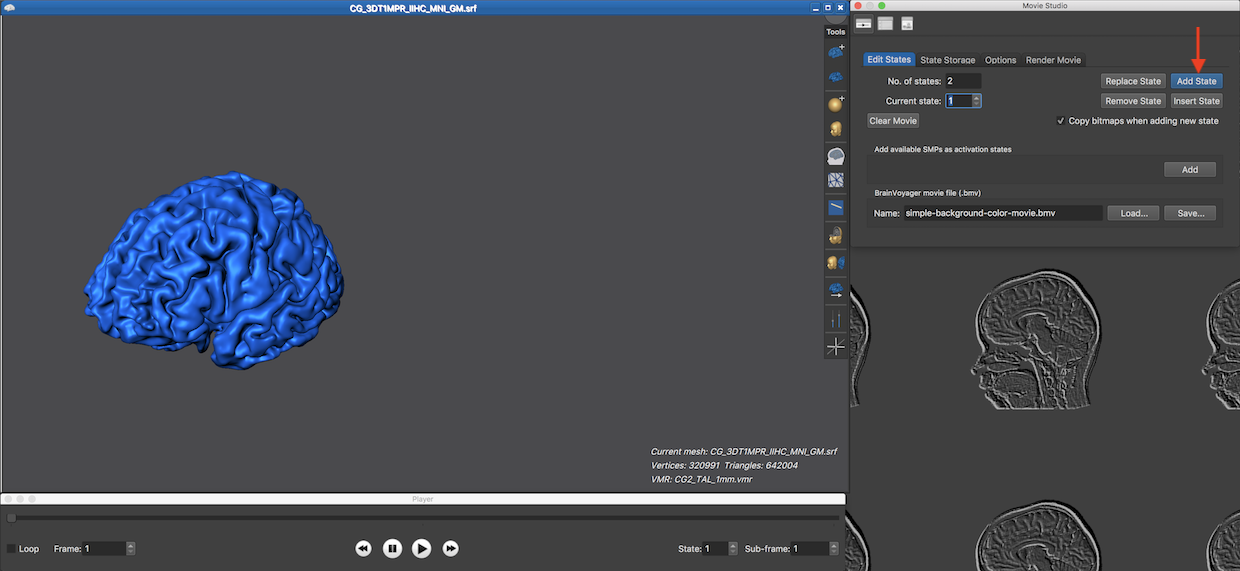
The snapshot above shows the Movie Studio window on the right side, which can be invoked using the Scene > Movie Studio menu item in case that a 3D Viewer is the current window. When the window is opened, the layout of BrainVoyager's workspace is put in sub-window view mode (if tabbed view mode was active before) and the 3D Viewer is resized to fit the default size of a 16:9 movie (1280 x 720). Below the 3D Viewer, Movie Studio's Player pane is shown (see snapshot above).
In the example snapshot above, a cortex mesh has been loaded. To define a state, simply click the Add State button in the Edit State tab of the Movie Studio window. When a state is created, it will save the names of all meshes that are loaded at that time. If meshes are added or removed when subsequent states are defined, those meshes are added or removed also when the movie is played back. Besides storing the names of the meshes, a state stores also additional information about each available mesh:
- The color of each vertex, which can be used for activation movies
- The coordinates of each vertex, which can be used for morphing movies
- The level of mesh slicing (if any), which can be used to create slicing movies
Besides information about individual meshes, Movie Studio saves the following information:
- The viewpoint of the current scene, which can be used to make "fly-around" movies
- One or more bitmaps, which can be used to present a "virtual screen" or explanatory information
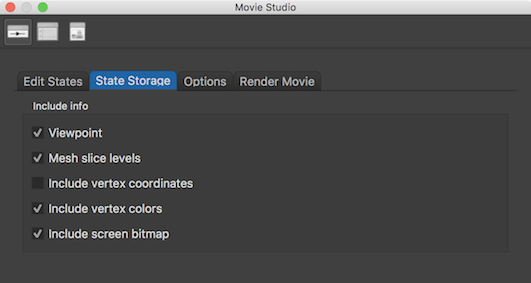
Note that all these properties can be combined in any given state and that a change in any of these properties will be "tracked" across states and smoothly animated. In order to not waste too much memory (on disk and in working memory), it is possible to specify which properties should be stored when defining new states. The State Storage tab (see snapshot above) shows the information in the Include info field, which is included when adding new states. As default, all but the vertex coordinates info is turned on as default. If not all information is needed for a specific movie, the respective options can be turned off before defining states.
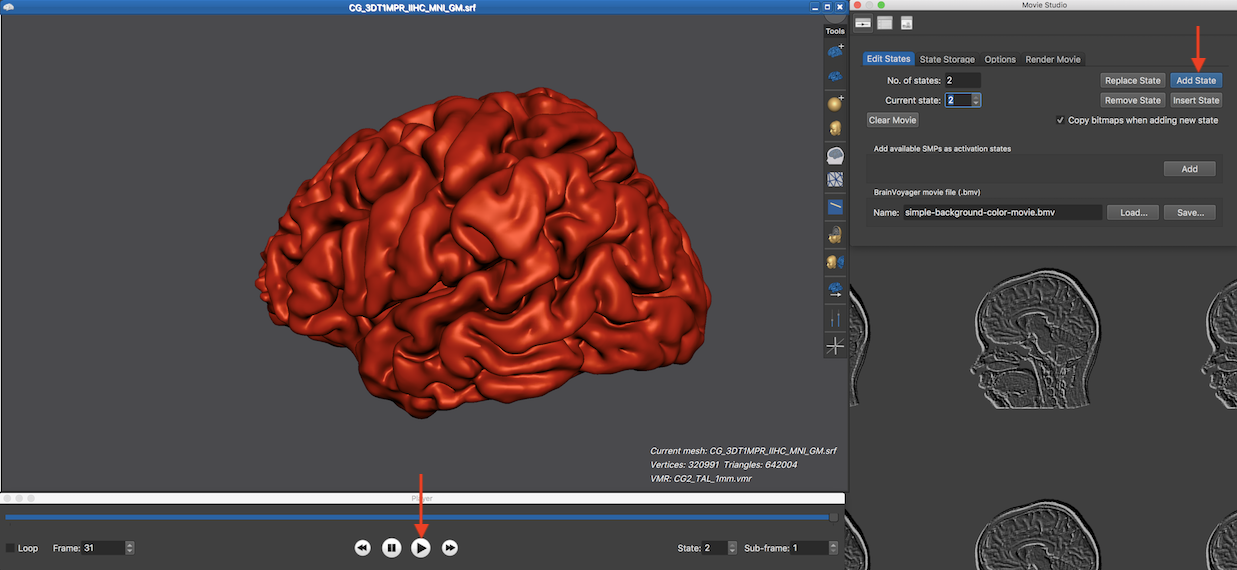
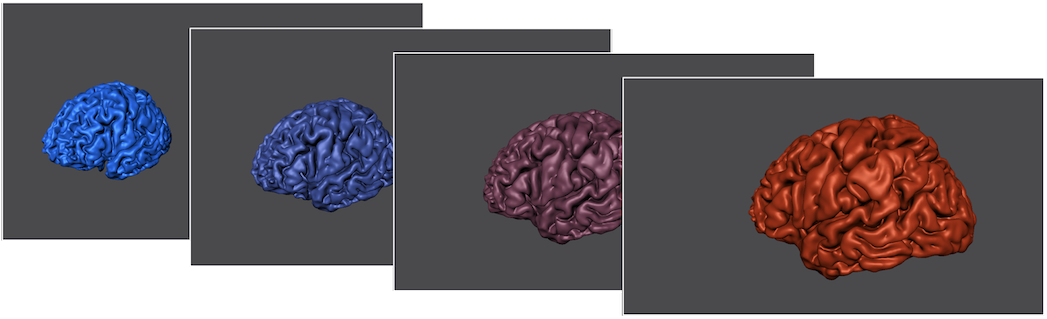
In the snapshot above, the viewpoint has been changed (rotation and zoom change) and also the color of the mesh (from blue to red) before a second state had been defined by clicking the Add State button. Since there are now two states, the movie can be played by clicking the Play button in the middle of the Player pane, which will show a smooth transition of the viewpoint and mesh color from state 1 to state 2. The figure below shows the first and last state but also two inter-state frames that are automatically calculated by Movie Studio when clicking the Play button:
In the same way as the viewpoint and mesh color (at each vertex) are interpolated smoothly between states, the vertex coordinates as well as the level of mesh slicing can be "animated". If, for example, the mesh vertex coordinates change from one state (e.g. folded mesh) to the next (e.g. inflated mesh), Movie Studio will calculate a smooth inflation animation between the two states. Movies can be saved to disk using the Save button in the BrainVoyager movie file (.bmv) field in the Movie Studio window. This will save the information about all states in a BrainVoyager movie (BMV) file. To re-load a BMV movie file at a later time to play it or to edit it, use the Load button in the BrainVoyager movie file (.bmv) field. Note that a .bmv file mainly refers to information such as the meshes or bitmaps used to create a movie, and it is thus essential that the referred files are available when reloading a movie file. It is thus recommended to store the .bmv file and all movie-related ifiles inside a "master" folder (eventually with sub-folders like "meshes", "bitmaps" etc.).
The next topic describes how created movies can be edited.
Copyright © 2023 Rainer Goebel. All rights reserved.