BrainVoyager v23.0
Editing Movies
When adding more and more state frames to a movie, it becomes increasingly important to have an overview about the defined states, and to quickly allow changing the content of a state. Limited browsing through states is possible when using the State spin box in the Player pane or the Current state spin box in the Edit States tab of the Movie Studio window. For a more global overview, Movie Studio provides the States Timeline pane containing a table listing all defined states with associated information and a visual thumbnail view of the content of each state. To show/hide the States Timeline pane, click the Timeline icon in the toolbar of the Movie Studio window (see snapshot below).
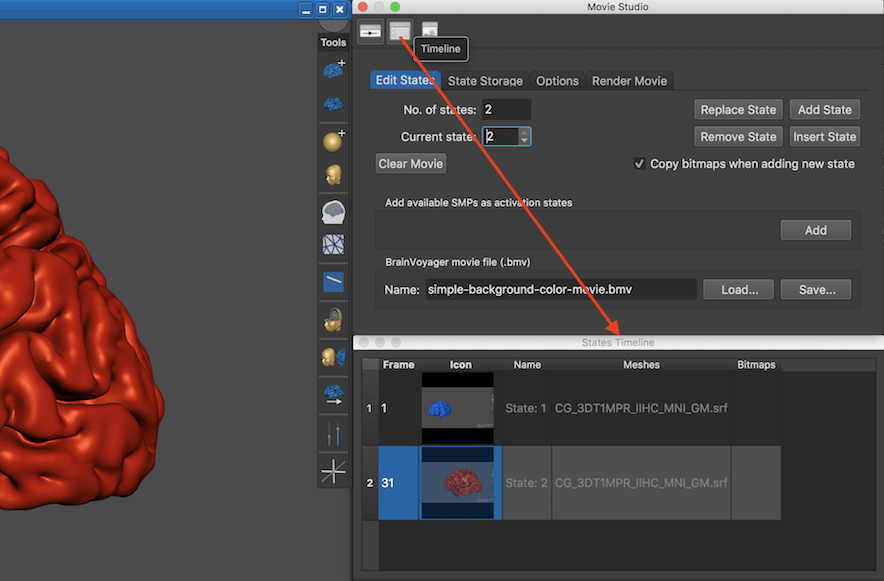
The States Timeline pane shows one row per state. The first column, Frame, shows the absolute frame number after which the respective state will be reached (see below on how to change the number of frames between states). The second column, Icon, contains a thumbnail with a small view of the 3D Viewer window at the moment when the state was captured. The third column, Name, contains a name for each state, which is simply "State <N>" as default. To give a sate a more expressive name, simply override it by double-clicking the respective cell in the table. The fourth column, Meshes, contains the names of the meshes, which were present when a state had been defined and which will be reloaded from disk if necessary. The fifth column, Bitmaps, contains the names of bitmaps, which have been associated with a state (for details, see topic Adding Bitmaps). To jump to a specific state, simply click the state's row. The 3D Viewer window will immediately be updated to show the content of the selected state.
The states defining a BrainVoyager movie can be edited using the buttons in the Edit States tab. Individual states can be removed from a movie by clicking the Remove State button. One can also start from scratch deleting any current definition by clicking the Clear Movie button. As described earlier, a new state can be added at the end of the current movie by clicking the Add State button. To insert a state after the currently selected state, the Insert State button can be used. When working with bitmaps it might be helpful to transfer a list of bitmaps defined in an earlier state to newly defined states. If the Copy bitmaps when adding new states option is turned on (default), the bitmaps from the previous state will be copied over to the new state. The content of a state can also be replaced by the current content in the 3D Viewer window by clicking the Replace State button. The possibility to replace a state's content is very useful when fine-tuning a movie.
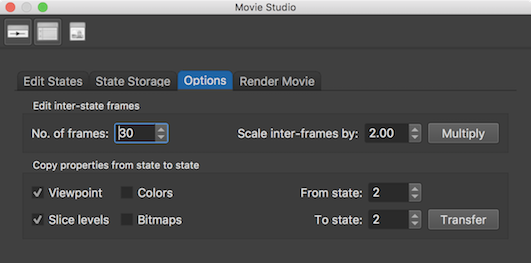
When adding a state, a number of inter-state frames is added for interpolation between states. The default number of inter-frames is 30 and can be changed using the No. of frames spin box in the Edit inter-state frames field in the Options tab of the Movie Studio window (see snapshot above). The number of inter-state frames in this field will be used when adding/inserting a new state. The number of inter-state frames for all existing states can be changed also later by clicking the Multiply button. This will multiply the number of inter-frames for each state by the number specified in the Scale inter-frame by spin box. If this value is, for example, "2.0", the number of inter-state frames between successive states will be doubled, e.g. from 1, 16, 31.. to 1, 31, 61... This is an important option for defining the final "smoothness" of a movie and it helps in determining the speed of a rendered movie when exporting the calculated movie frames to a series of bitmaps or a standard movie (e.g. .mp4) file.
It is also possible to copy selected information stored in one state to another state using the Transfer button in the Copy properties from state to state field of the Options tab. The source and target states can be selected in the From state and To state fields and the information to be copied can be selected bye checking the Viewpoint, Slice levels, Colors and Bitmaps options.
Copyright © 2023 Rainer Goebel. All rights reserved.