BrainVoyager QX v2.8
Motion Detection and Correction
Background
The quality of fMRI data is strongly hampered in the presence of substantial head movements. Many fMRI experts recommend to reject data sets for further analysis if head motion of more than 1-2 voxels or 5 or more millimeters is detected. Although head motion can be corrected in image space, displacements of the head reduce the homogeneity of the magnetic field, which is fine-tuned ("shimmed") prior to functional scans for a given head position. Since head displacements lead to non-optimal shimming, motion artefacts are not fully removed even after perfect realignment of successive functional volumes in image space. If head movements are small, motion correction is a useful step to improve the data quality for subsequent statistical data analysis. Motion correction operates by selecting one functional volume of a run (or a volume from another run of the same scanning session) as a reference to which all other functional volumes are aligned. Most head motion algorithms describe head movements by 6 parameters, three translation (displacement) parameters and three rotation parameters. These six parameters are appropriate to characterize motion of rigid bodies, since any spatial displacement of rigid bodies can be described by translation along the x, y and z-axes and rotation around these axes. These six parameters are estimated iteratively by analyzing how a source volume should be translated and rotated in order to better align with the reference volume. An often used goodness-of-fit measure is the difference of intensity values of corresponding positions in the reference volume and the transformed source volume given the current translation and rotation parameters. The iterative adjustment of the parameters stops if no further improvement can be achieved, i.e. when a minimum has been found. This iterative minimization procedure is performed using a standard optimization algorithm (Levenberg-Marquardt, a nonlinear least-squares routine, see Numerical Recipes) in BrainVoyager QX. After the final motion parameters have been detected, they can be applied to the source volume to produce a new volume replacing the original volume in the motion corrected data set. Note that the creation of the corrected volume requires spatial interpolation, i.e signal values need to be calculated at positions falling in-between measured data points.
For visual inspection, line plots of the translation and rotation parameters across time show how the estimated values change from volume to volume. The obtained parameter time courses may also be integrated in subsequent statistical data analysis with the aim to remove residual motion artifacts (for details, see x). Note that the assumption of rigid body motion is not strictly valid for fMRI data since the individual slices of a functional volume are not scanned in parallel. Since abrupt head motions may occur at any moment in time, the assumption of a rigid body is violated. Imagine, for example, that a subject does not move while the first five slices of a functional volume are scanned, then moves 2 mm along the y-axis and then lies still until scanning of that volume has been completed. The six parameters of a rigid body approach are not sufficient to capture such "within-volume" motion correctly. Fortunately, head movements from volume to volume are typically small and the assumption of a moving rigid body is largely valid.
Running 3D Motion Correction
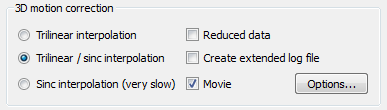
The snapshot above shows the basic options available to control 3D motion correction in BrainVoyager QX. The three options on the left side determine the interpolation option used in the head motion detection step and the head motion correction (spatial transformation) step:
- Trilinear interpolation. Linear interpolation is used both during motion detection and motion correction. This is a very fast approach that can be used if one can tolerate that the resulting functional data is slightly smoothed (linear interpolation introduces a small amount of spatial smoothing).
- Trilinear / sinc interpolation. Linear interpolation is used during motion detection, while sinc interpolation is used for the actual motion correction step. This approach is recommended (default) because it results in the highest quality but it is substantially slower than the previous approach. While the motion detection step is the same as above (same quality), the actual motion correction step is performed using windowed sinc interpolation resulting in corrected functional volumes that reflect the original data as close as possible (i.e. no spatial smoothing is introduced).
- Sinc interpolation. Sinc interpolation is used both during motion detection and motion correction. This results in very slow execution time while not producing better results than the trilinear / sinc interpolation. In the contrary, it is recommended to slightly smooth functional data in order to better detect motion parameters as is done in the trilinear / sinc approach. We thus do not recommend using this option and only added it for completeness.
The Reduced data option may be used to save some calculation time. If turned on, motion detection is not performed using full functional volumes but accesses only a reduced set of voxels depending on the dimensions of the volume; the exact reduction used in each dimension is printed in the motion correction log file (see below). This option is turned off as default since the gain in calculation time is no longer that relevant using modern computer hardware (the option was on as default in BrainVoyager QX 2.1 and earlier).

When running motion correction, a file is produced that contains for each aligned volume the six rigid body parameters that were detected and used to transform the respective volume. The begin of such a file is shown in the snapshot above. The name of the produced log file will be "[FMR-Name]_3DMC.log" and located in the folder that contains the FMR file. Each line also shows the number of iterations (n_its) that were used to determine the motion parameters. If one wants to see more details about the individual iterations of motion detection, one can turn on the Create extended log file option in the 3D motion correction field. This will save a second log file with the name "[FMR-Name]_3DMC_verbose.log". BrainVoyager also stores a "[FMR-Name]_3DMC.sdm" design matrix file that contains the same information as the standard log file but formatted in a way that it can be added to subsequent statistical data analyses as a set of confound predictors that may reduce residual motion artefacts.
More Options
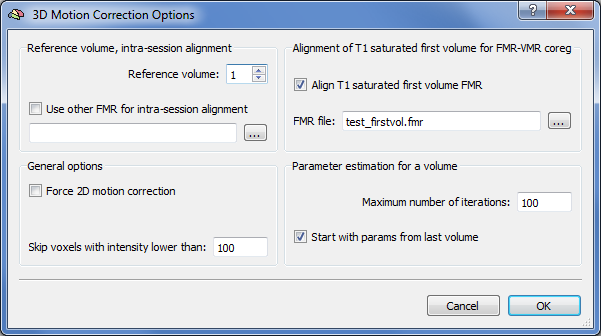
Further important settings can be performed in the 3D Motion Correction Options dialog that is displayed after clicking Options in the 3D motion correction field. The Reference volume spin box allows to change which volume to use as a reference to which all other volumes should be aligned (default: first volume). The Use other FMR for intra-session alignment option is very important in case that multiple runs have been performed within the same scanning session since it allows to align all functional volumes from all functional runs to the same reference volume. If, for example, three runs have been performed per subject (e.g. "Subj1_Run1.fmr", "Subj1_Run2.fmr", "Subj1_Run3.fmr"), the volumes of the first functional run are aligned to the reference volume (e.g. volume 1). When preprocessing the second run ("Subj1_Run2.fmr"), however, the FMR file of the first run is specified ( "Subj1_Run1.fmr") in the Use other FMR for intra-session alignment text box so that the volumes of the second run are also aligned to the reference volume (set to "1") of the first run. Similarly, if the third run is preprocessed, the reference volume of the first run is specified again to also align the functional volumes of the third run to the same reference volume. Note that this "across-run" motion correction is only possible if all runs of a subject were recorded with the same slice parameters (same number of slices with same slice positioning in each run). If all runs are aligned to the same functional volume, the same FMR-VMR alignment files (for initial and fine-tuning adjustment) can be used for all runs. If this option is not used, the FMR-VMR alignment tool needs to be performed for each run separately.
Quality Assurance Tools
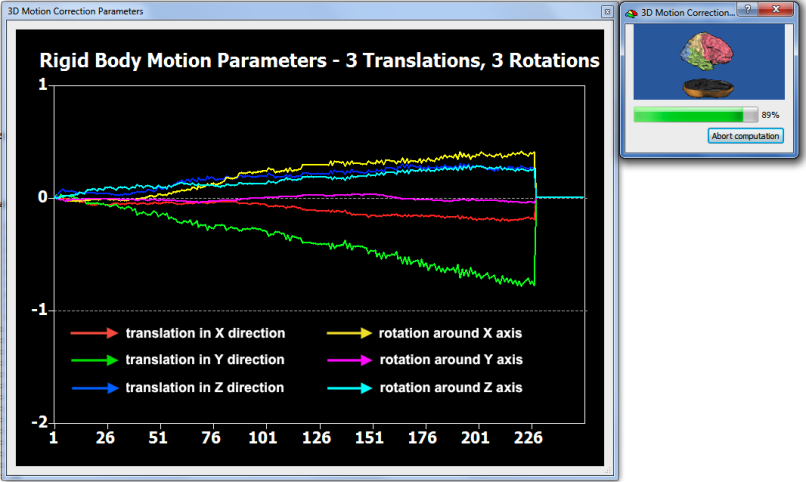
In order to check that motion correction works effectively, BrainVoyager displays the 6 rigid motion parameters in a line plot (see snapshot above) and also saves them to disk (see above). For visual inspection, a movie is produced in case that the Movie option is checked (default) in the 3D motion correction field. The movie records a 3D view of the first and last volume of the FMR data set and "toggles" between the two by showing them a few times rapidly in successsion.
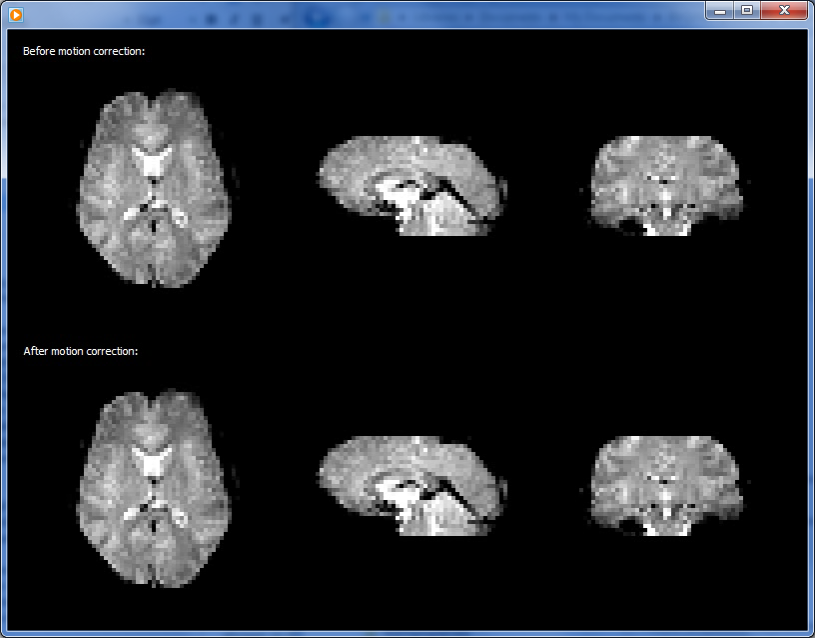
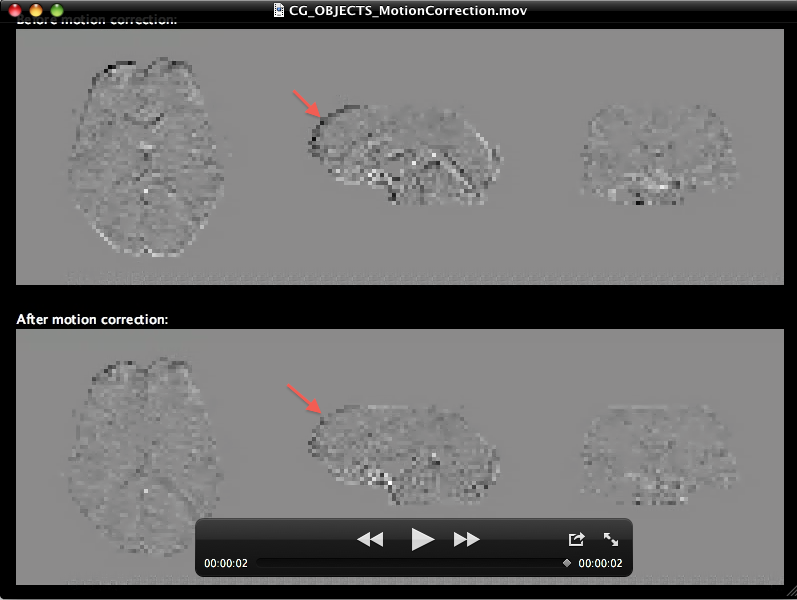
The snapshot above shows one frame of the generated movie in Windows Media player. The upper half shows the volume before and the lower half the state of the volume after 3D motion correction. Since head motion is usually small, differences are not easily detectable in such a static view. The running movie, however, shows differences more sensitive by toggling such a view between the first and last volume. Furhtermore, the last frame of the movie contains a difference image in which the first volume intensities are subtracted from theh last volume highlighting small differences. The snapshot below shows that last movie frame of the generated movie in Quicktime player on Mac OS X. Despite sub-voxel head motion, the intensity differences at the border of the volume are much less strong after motion correction (see arrow in lower half) than before motion correction (see arrow in upper half).
Platform-Specific Notes
The generated movie is stored in the folder of the preprocessed FMR project and can be launched using standard methods (e.g. double-click). On Mac OS X, the created movie ("[FMR-Name]_MotionCorrection.mov") is launched automatically after motion correction. On Windows, the created movie ("[FMR-Name]_MotionCorrection.avi") is not (yet) launched automatically but can be started, e.g., using Windows Explorer. The creation of movies is not (yet) supported on Linux.
Application of Motion Parameters From File
While the standard motion correction procedure performs both detection and application of motion parameters, it is also possible to apply motion parameters stored in a matrix (.SDM) file to FMR-STC (or DMR-DWI) projects. This separates the motion detection from the correction step allowing to apply previously (or externally) calculated motion parameters. The data in the .SDM file must contain the six motion parameters (3 translations along x, y, z axis and 3 rotations around x, y, z axis) defined for each time point.
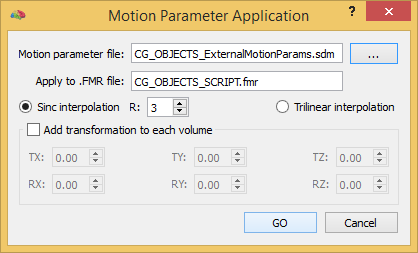
To apply an external motion parameter file, invoke the Motion Parameter Application dialog (see snapshot above) using the Apply Motion Parameters From File item in the Options menu. The menu item is only available in case that a FMR or DMR project is active in the document workspace. The name of the current document is shown in the Apply to .FMR file (or Apply to .DMR file) field. The only required input parameter is the name of the file containing the 6 motion parameters that can be invoked using the Browse button on the right side of the Motion parameter file field. As default, the Sinc interpolation option is turned on, i.e. the FMR-STC (DMR-DWI) data will be resampled using sinc interpolation with a default R value of 3. To switch to trilinear interpolation, turn on the Trilinear interpolation option.
It is also possible to add an additional rigid transformation to each volume when applying the motion parameters. This can be, for example, used to add a intra-session run-to-run adjustment transformation in case that the limits of the in-build across-run motion correction are reached, which may happen if the (first) volumes of the runs are displaced by more than about 5-10 mm. To enable this option, turn on the Add transformation to each volume field and add the values for the 6 constant realignment parameters in the respective TX, TY, TZ, RX, RY and RZ fields. When all options have been specified, the GO button can be clicked to start the motion correction process.
The motion parameters are interpreted by BrainVoyager as follows:
- Translation X (TX): positive values move the image to the right
- Translation Y (TY): positive values move the image down (in-plane)
- Translation Z (TZ): positive values move the images up (through-plane)
- Rotation X (RX): positive values rotate through-plane around left-right axis so that front part of image comes up and the back part goes down
- Rotation Y (RY): positive values rotate through-plane around top-bottom axis so that right part of image comes up and left part goes down
- Rotation Z (RZ): positive values rotate in-plane to the left
Copyright © 2014 Rainer Goebel. All rights reserved.