BrainVoyager QX v2.8
Coregistration of Functional and Anatomical Data Sets
The coregistration routines in BrainVoyager QX aim at a fully automatic, highly precise alignment of functional (FMR) and anatomical (VMR) data sets. To guarantee a good alignment result in any situation, the coregistration process has been split into two main stages:
The goal of the initial alignment step is to bring the functional and anatomical data sets in close proximity from a potentially very different starting point. If, for example, the functional data is recorded in the axial plane while the anatomical data is recorded in the sagittal plane, the intial alignment should bring them at least in the same global orientation, i.e. by using large rotations and translation values. The fine-tuning alignment step on the other hand assumes that the two data sets are already pretty close to each other, which may allow iterative minimization techniques to do an automatic fine adjustment of the alignment in a similar way as during 3D motion correction. To allow a successful coregistration in any situation, both the initial and fine-tuning alignment step can be performed in several ways. In the optimal situation, the functional and anatomical data sets are from the same scanning session and information about the scanning parameters (slice positioning) is available for both data sets, i.e. from the original DICOM files. In this situation, the initial alignment performs a mathematically exact coregistration of the functional and anatomical data. Since the subject, however, might have made small head movements between the functional and anatomical scans, small additional adjustments might be necessary, which can be performed using the fine-tuning alignment step.
Source and target. The coregistration routines keep the VMR data set fixed and scales, translates and rotates the FMR data to match the space of the VMR data set. The scaling operation of the functional data is performed as the first step by transforming a set of functional slices into a volume with the same resolution as the VMR file. For this scaling transformation, the program uses the voxel resolution values stored in the selected FMR file. The mathematical and corresponding alignment routines subsequently perform a rigid body transformation (rotations and translations). The mathematical alignment is in principle able to perform additional scaling and shearing adjustments (full affine trasformation) but these options are turned off in the present implementation. In the context of functional and anatomical coregistration, we refer to the FMR data set as the "source" and the VMR data set as the "target" of alignment.
Which VMR file? To start the alignment process, you must load the VMR data set to which you want to align the functional data. If you have, for example, recorded a 3D anatomical data set in the same session as the functional data, open the respective VMR file. In case your original 3D data was not in BrainVoyager's standard sagittal view and/or did not contain 1 mm isometric voxels, you should not load the original VMR file but the one which has been transformed into the standard sagittal view with 1mm iso voxels. If appropriate header information was available during project creation, BrainVoyager QX will have automatically performed the necessary standardization steps and you should have a file. with an extension such as "_ISO_SAG.vmr" (or "_ISO.vmr" or "_SAG.vmr", if only one of the two standardization steps were necessary). For details on standardization of original VMR data sets, see topic xx. If your VMR data set exhibits intensity inhomogeneities and you have run the intensity inhomogenity correction procedure, than you should load that file. For the subsequent automatic fine-tuning adjustment step, it is important to use a VMR file without intensity inhomogeneities. In the example ("OBJECTS") data set used in the snapshots below, the original intra-session VMR file has been created as "CG_3DT1MPR.vmr". Since the data set had been recorded in the sagittal standard view with a 1 mm isovoxel resolution, no spatial transformations were necessary. The data was, however, inhomogeneity corrected and therefore we use the file "CG_3DT1MPR_INH.vmr" for coregistration.
If you have loaded the proper target VMR file, the 3D Volume Tools dialog will appear automatically. Enlarge the dialog by clicking the Full dialog >> button and then switch to the Coregistration tab. The alignment of functional and anatomical data sets is performed using the FMR-VMR Coregistration dialog, which can be called by clicking the Align button in the FMR-VMR coregistration field of the Coregistration tab (see snapshot below).
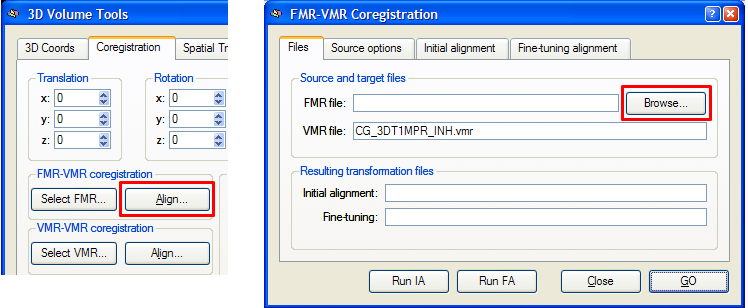
The VMR file: text box in the Source and target files field of the Files tab shows the currently loaded target VMR file, which is "CG_3DT1MPR_INH.vmr" in the example snapshot above. In order to align a functional data set to the loaded target VMR data set, you must first specify the respective FMR file using the Browse button in the Source and target files field (you might also choose the FMR source file prior to calling the FMR-VMR Coregistration dialog by using the Select FMR button in the FMR-VMR coregistration field of the Coregistration tab of the 3D Volume Tools dialog). After selection of the source FMR file, the Files tab of the FMR-VMR Coregistration dialog shows the selected source FMR file in the FMR file: text box as well as names for the transformation files, which will be produced and automatically saved when running the respective alignment steps. The transformation files are in the Initial alignment: and Fine-tuning: text boxes of the Resulting transformation files field.
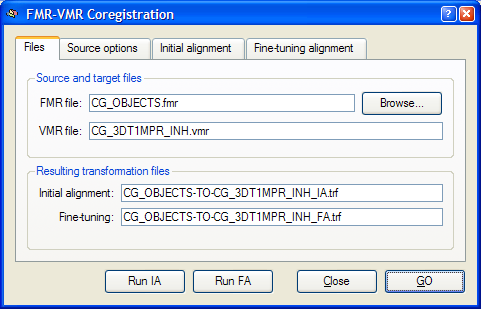
In the example snapshot above, the source FMR file "CG_OBJECTS.fmr" has been selected. From the source FMR and target VMR files, the program generates the two resulting alignment file names by concatenating the FMR file name with the substring "-TO-" and the name of the VMR file. The two file names end with the substring "_IA.trf" and "_FA.trf" respectively.
At this point you can simply click the GO button to start the initial and fine-tuning alignment. Depending on your data files, this might not lead to a successful coregistration in all cases. It is thus advisable to run the two alignment steps separately and to learn about the available options in the respective initial alignment and fine-tuning alignment help sections.
Which FMR file? In the example above, the FMR file, which was created from the raw data has been selected. As alternatives, one could have selected the FMR file of the first volume, i.e. "CG_OBJECTS_firstvol.fmr". In case that the true T1-saturated first volume of a functional scan is available (and not discarded already at the scanner site), the first volume is the optimal volume for the intensity-driven fine-tuning alignment step. If not turned off, BrainVoyager QX creates automatically a AMR representation of the first volume during project creation. This file is automatically attached to the standard FMR file, i.e. "CG_OBJECTS.fmr". This linked AMR file of the first volume is used as default for the intensity-driven fine-tuning alignment step. It does, thus, not matter whether the first-volume FMR, the raw-data FMR (i.e. "CG_OBJECTS.fmr") or even the preprocessed FMR (i.e. "CG_OBJECTS_3DMC_SCSAI_LTR_THP3c.fmr") file is selected as the source of alignment since all these files have a link to the same AMR file (i.e. "CG_OBJECTS_firstvol_as_anat.amr"), which is build from the first volume of raw data. In case you do not want to use the attached AMR file for alignment, you must change the default setting in the Source options tab of the FMR-VMR Coregistration dialog, which is shown below.
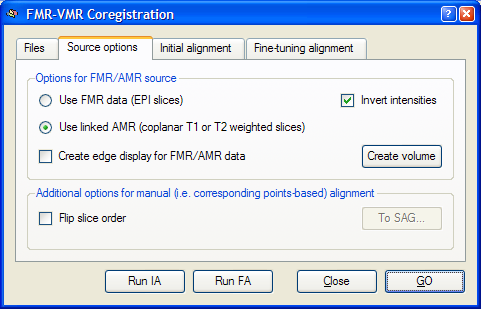
As described above, the default option in the Options for FMR/AMR source field is Use linked AMR opton. To use the first EPI volume of the functional data instead, select the Use FMR data option. Another option in this tab is the Invert intensities option, which is turned on as default: By inverting the intensities of T2* weighted functional data, the resulting images look similar to T1 weighted anatomical data. This inversion is important for the intensity-driven adjustments during the fine-tuning alignment step. If you have linked a true anatomical coplanar set of slices (i.e. a special high-resolution T1 weighted scan of the functional slices), you should turn off this option.
The Flip slice order and the To SAG options in the Additional options for manual alignment field are important if there is no header information available for the initial alignment stage. In this case, it might be sometimes necessary to be able to flip the order of slices of the functional data, which can be achieved by turning on the Flip slice order option. If the initial alignment is done by the "corresponding points method", it is helpful to first orient the functional data into BrainVoyager's standard sagittal view, which can be done using the To SAG option. If this option is greyed out, click the Create volume button in the Options for FMR/VMR source field first.
Copyright © 2014 Rainer Goebel. All rights reserved.