

BrainVoyager 22 - Part 1: BV Notebooks
December 20, 2020
An important aspect of BrainVoyager development in recent yeas is the support of reproducible data analysis. An important feature in this direction was the introduction of the Data Analysis Manager enabling easy specification of analysis pipelines for small or large studies with consistent parameter sets. BrainVoyager 22 goes a big step further by introducing BrainVoyager Notebooks, or BV Notebooks for short. Inspired by Jupyter notebooks, BV notebooks provide sharable rich interactive documents containing code, explanatory text, images and animations in a sequence of cells. Furthermore, BV notebooks also contain interactive BrainVoyager Viewers that enable browsing through 3D volumes or inspecting brain surfaces with overlaid maps right inside notebooks. These "living documents" can be rerun step-by-step (or in one go) to reproduce processing steps. The following figure shows part of one of the example notebooks that are installed in the user's "Documents/BrainVoyager/Notebooks" folder:
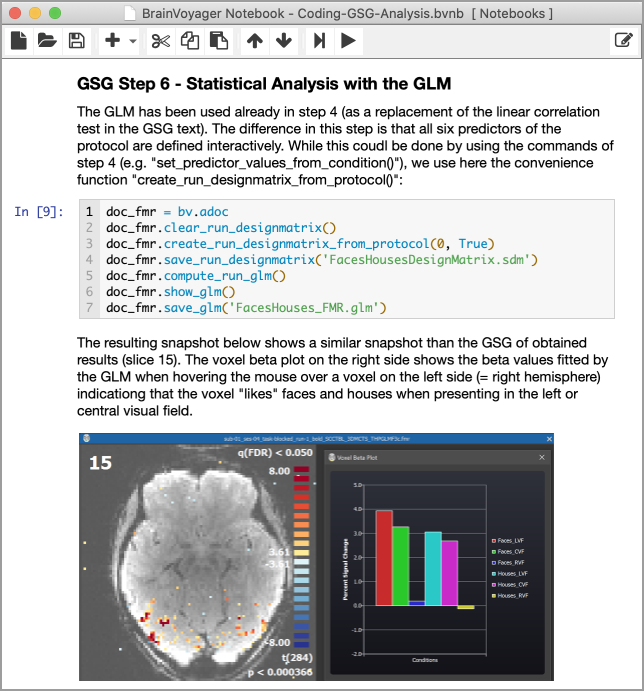
The figure above illustrates how these rich documents appear inside the BV Notebook main window in BrainVoyager (or in the standalone BV Notebook application). The figure also illustrates that a notebook is composed as a sequence of cells containing either code, rich text, and images (plus animations and interactive BV viewers). Python code cells can access the always available "brainvoyager" (or "bv") object to call into BrainVoyager's functionality. The code can, for example, be used to load standard BrainVoyager or NIfTI files from disk; it can also access documents currently open in BrainVoyager as shown in the code above (the "bv.adoc" line is a short version of "brainvoyager.active_document"). With access to a document object, its provided functions can be called. This object-oriented approach simplifies code writing. The (FMR) document above can, for example, create a design matrix from the attached protocol (line 3) and launch a single-run GLM calculation (line 5). Quick online help as well as the Python Developer Guide describes the available functionality of the BrainVoyager programming interface.
While the generated code is sufficient to document the performed preprocessing commands with their (non-default) parameters, a notebook can be enriched by additional explanatory text, graphics, animations and viewers. The figure below shows an added Markdown cell in editing mode providing a headline for the performed analysis.

Besides Markdown text, images produced in the main user interface during (pre-)processing can be added to the notebook by a simple keyboard shortcut command (CTRL-G) after the respective window or dialog has been selected. The figure below shows the notebook after "sending" the motion parameter plot and adding a Markdown text cell with a sub-title:
A particularly interesting feature of BV notebooks is the possibility to embed BrainVoyager viewers in the output section of code cells. The "embed_viewer()" command can be manually added but it is also included in many scenarios when code is generated automatically, for example, when (NIfTI or standard BV) documents are opened or when GLM contrasts are displayed. The following figure is a screenshot of a section of a provided notebook with generated code when the 'Getting Started Guide' dataset was analysed using the user interface.
Line 8 of the code that was sent to the notebook after overlaying a GLM has the "embed_viewer()" command. The output section of the code cell shows the embedded anatomical viewer that was also sent to the notebook automatically; note that the embedded viewer will also be created when running the code in the notebook at a later time. As default, an embedded viewer displays only a static image. Double-clicking the image converts it into a 3D viewer in-place, allowing to navigate with the mouse through the respective anatomical 3D volume with the overlaid map.
This short blog post on how notebooks are (auto-)created describes only the most basic possibilities. Several example notebooks and the BV Notebooks chapter in the User's Guide provide detailed information on how to get the most out of this exciting new feature of BrainVoyager.
The figure above illustrates how these rich documents appear inside the BV Notebook main window in BrainVoyager (or in the standalone BV Notebook application). The figure also illustrates that a notebook is composed as a sequence of cells containing either code, rich text, and images (plus animations and interactive BV viewers). Python code cells can access the always available "brainvoyager" (or "bv") object to call into BrainVoyager's functionality. The code can, for example, be used to load standard BrainVoyager or NIfTI files from disk; it can also access documents currently open in BrainVoyager as shown in the code above (the "bv.adoc" line is a short version of "brainvoyager.active_document"). With access to a document object, its provided functions can be called. This object-oriented approach simplifies code writing. The (FMR) document above can, for example, create a design matrix from the attached protocol (line 3) and launch a single-run GLM calculation (line 5). Quick online help as well as the Python Developer Guide describes the available functionality of the BrainVoyager programming interface.
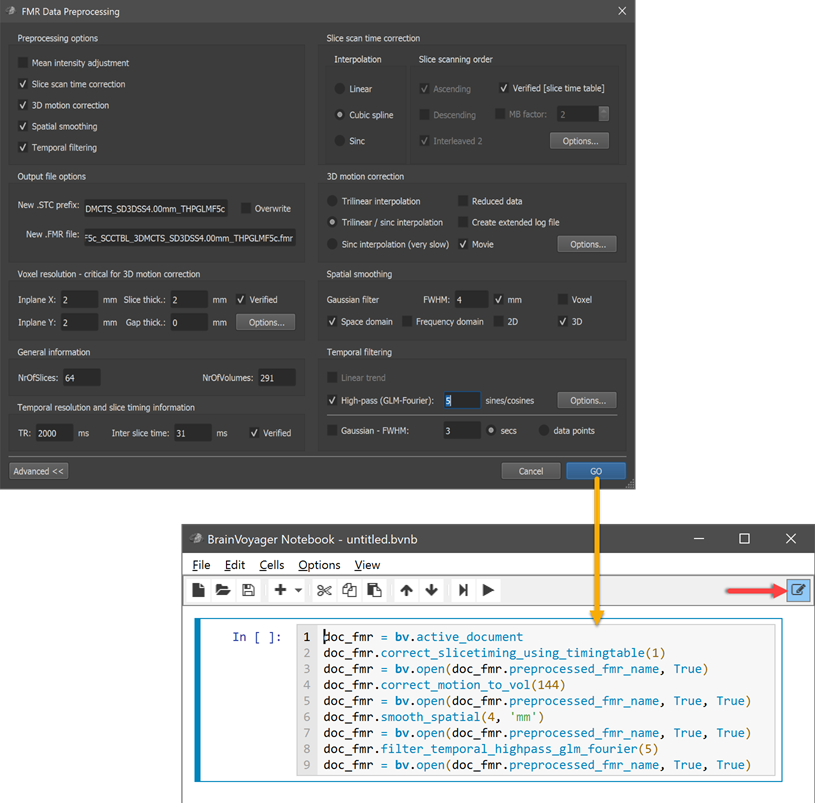
Converting GUI Actions Automatically into Python Code
BV Notebooks provide a new level of transparency for BrainVoyager users by documenting performed analysis steps as Python code. Besides entering code explicitly, BrainVoyager offers the exciting possibility to write code automatically when turning on the option to convert GUI actions into corresponding code. BV notebooks, thus, not only offer (script) programmers a means to write and document code but they also support non-programmers by converting essential GUI actions automatically into corresponding code. If, for example, the GO button in the FMR Preprocessing dialog is clicked, all selected preprocessing operations are converted into Python code, which is added to the current notebook. The auto-generated Python code contains BrainVoyager API (scripting) commands and, thus, serves as documentation of analysis steps that were executed in the user interface; furthermore, the auto-generated Python code can be rerun at a later time to reproduce derived data. The (auto-)written code can be easily enriched with rich text, images, animations and viewers.While the generated code is sufficient to document the performed preprocessing commands with their (non-default) parameters, a notebook can be enriched by additional explanatory text, graphics, animations and viewers. The figure below shows an added Markdown cell in editing mode providing a headline for the performed analysis.
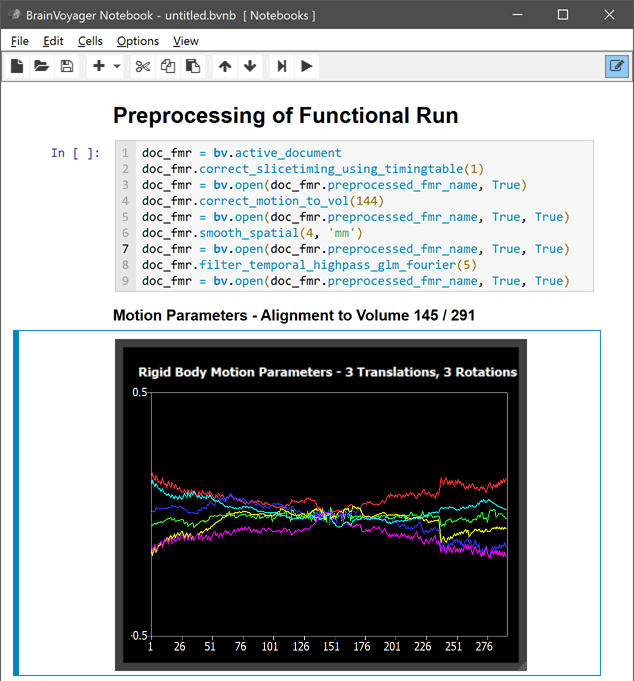
Besides Markdown text, images produced in the main user interface during (pre-)processing can be added to the notebook by a simple keyboard shortcut command (CTRL-G) after the respective window or dialog has been selected. The figure below shows the notebook after "sending" the motion parameter plot and adding a Markdown text cell with a sub-title:
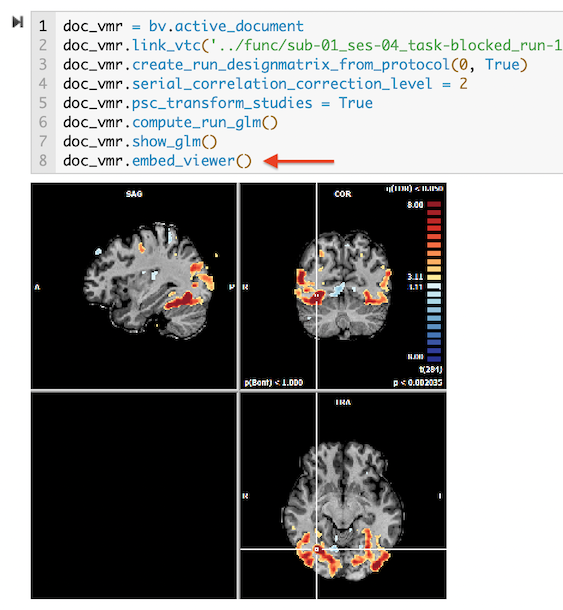
A particularly interesting feature of BV notebooks is the possibility to embed BrainVoyager viewers in the output section of code cells. The "embed_viewer()" command can be manually added but it is also included in many scenarios when code is generated automatically, for example, when (NIfTI or standard BV) documents are opened or when GLM contrasts are displayed. The following figure is a screenshot of a section of a provided notebook with generated code when the 'Getting Started Guide' dataset was analysed using the user interface.
Line 8 of the code that was sent to the notebook after overlaying a GLM has the "embed_viewer()" command. The output section of the code cell shows the embedded anatomical viewer that was also sent to the notebook automatically; note that the embedded viewer will also be created when running the code in the notebook at a later time. As default, an embedded viewer displays only a static image. Double-clicking the image converts it into a 3D viewer in-place, allowing to navigate with the mouse through the respective anatomical 3D volume with the overlaid map.
This short blog post on how notebooks are (auto-)created describes only the most basic possibilities. Several example notebooks and the BV Notebooks chapter in the User's Guide provide detailed information on how to get the most out of this exciting new feature of BrainVoyager.