While setting up comprehensive preprocessing pipelines is rather easy using the Preprocessing Workflow Definition dialog, it was necessary to repeat the process again for each new project even if one wants to use the same parameters for the respective sub-workflows as is usual practice in a neuroimaging lab. Since BrainVoyager v21.0 it is possible to simplify this process by using "template" workflows. Template workflows are generic descriptions of sub-workflows and their input-output relationships that can be applied to a new project after creating only the workflows for the original (BIDS) functional and 3D anatomical data, i.e. running the Create Document Workflow for each functional run and for a 3D data set of the same session. All preprocessing workflows for functional preprocessing, anatomical preprocessing, anatomical normaliztion, functional-to-anatomiacl coregistration and functional normalization can then be defined at once simply by loading a template workflow file. While BrainVoyager provides an example template file (described below), it is important that one can generate template files from existing projects to ensure that the desired preprocessing parameters are used when applying the template to new projects. Note that the template workflows do not (yet) support diffusion MRI files, i.e. they are limited to functional and 3D anatomical scans in version 21.0.
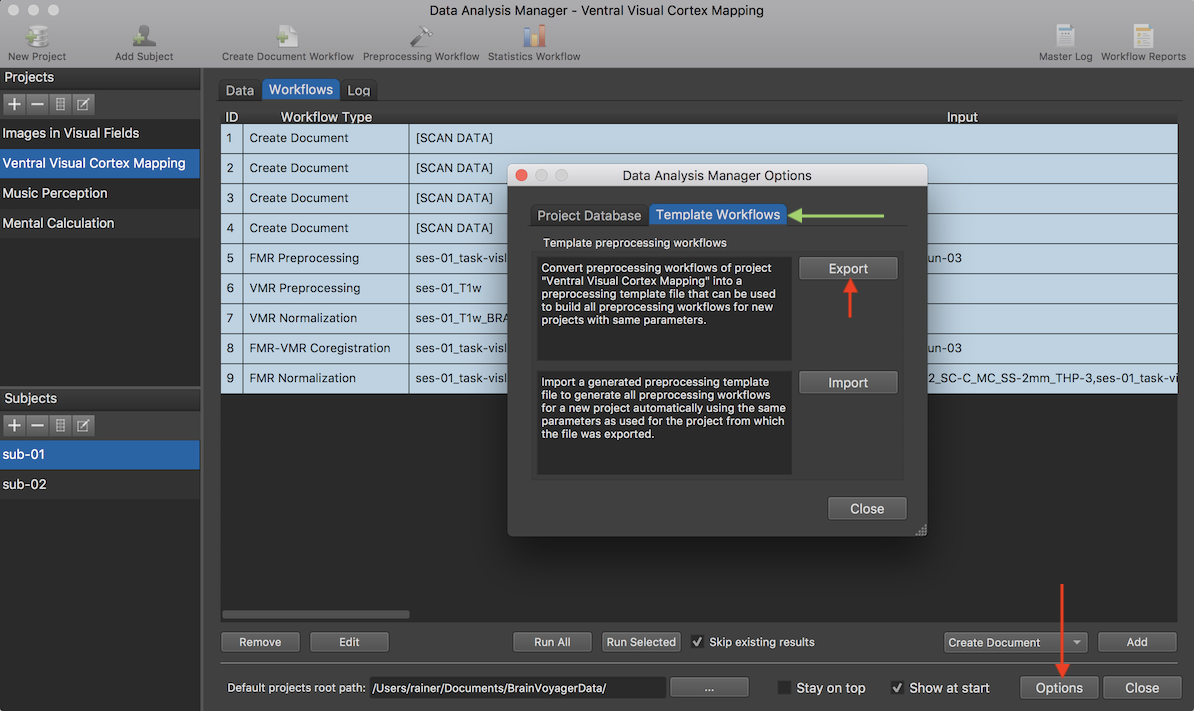
A template workflows file can be created from a project for which preprocessing templates have already been defined. The screenshot above shows the workflows defined for the typical sub-workflows as has been described in previous topics. In order to apply the same preprocessing steps to the data of a new project, the workflows specific to the selected project (here "Ventral Visual Cortex Mapping") can be converted to generic template workflows using the tools in the Data Analysis Manager Options dialog that can be invoked using the Options button in the Data Analysis Manager window (see red arrow above). Make sure that the dialog is switched to the Template Workflows tab (see above) to access the template workflow tools.
The top part of the Template processing workflows field contains the tool to generate a template workflow file from the current project as described in the text box on the left side of the Export button. After clicking the Export button, a file name can be entered (e.g. "PreprocessingTemplateWorkflows_1.json") and a location specified for saving the file. Note that the exported template workflow file is a JSON file that can be loaded in BrainVoyager using the Open JSON item in the File menu or using any software supporting visualization the contents of JSON files.
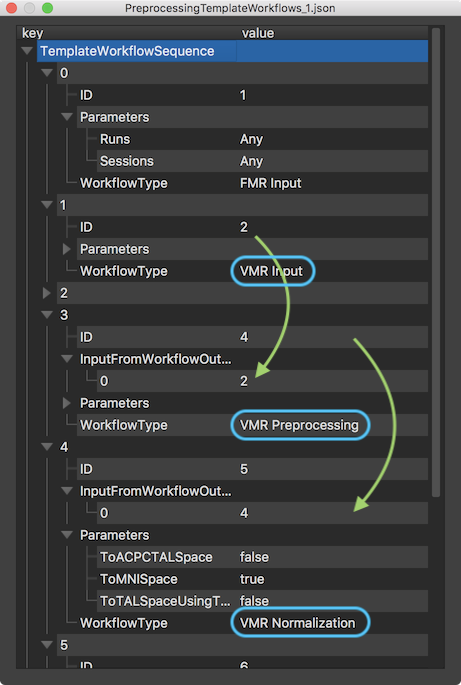
The screenshot above shows part of the template workflows JSON file loaded into BrainVoyager. While the contents of the visualized file might look complex, it simply describes the sequence of (typical) sub-workflows derived from the original project in a way that is abstracted from the names and number of input files. Each template workflow contains a WorkflowType key that defines the role of the respective template workflow, including values "FMR Input", "VMR Input", "FMR Preprocessing", "VMR Normalization" and so on. Each workflow template also contains the ID key that is used to specify the flow of processing in combination with the InputFromWorkflowOutput key. The latter key is not present for the input workflows ("FMR Input" and "VMR Input") that will be used to match to any number of functional runs as well as 3D anatomical files when applying the template to a new project (see below). Most importantly, each workflow also contains a Parameters key that contains the parameters for the respective sub-workflow as specified in the original project from which the template workflows have been derived.
For the case of the VMR input, the (blue) rectangles and (green) arrows in the screenshot above show how dependencies between workflows are coded to create preprocessing pipelines. The "VMR Preprocessing" template workflow contains value "2" in its InputFromWorkflowOutput field encoding the fact that any VMR document in the new project will be preprocessed as described in the Parameters entry of the VMR Preprocessing workflow (parameters not shown in the screenshot). Likewise, the "VMR Normalization" template workflow contains value "4" in its InputFromWorkflowOutput field encoding that the output of the VMR preprocessing workflow will be serving as input to the VMR normalization workflow. If one would have used the input VMR data directly for normalization (not recommended) in the source project, the value in the InputFromWorkflowOutput field would be "2" instead of "4". The Parameters key is expanded for the VMR Normalization workflow indicating that any VMR document will be normalized to MNI space (as opposed to Talairach space) as had been specified in the original project.
The exported template workflows file can now be applied to any new project. The new project need to be selected in the Projects pane and any functional run and 3D anatomical document should have been created. The screenshot below shows a new project ("Music Perception") that has been selected in the Projects pane. The Workflows tab shows that only Create Document workflows have been specified (see green highlight) as is required for the application of template workflows. In the screenshot below, the first two listed workflows in the Workflows table specify the creation of two functional documents for the two runs (task "music") used in a single session of the project as well as one same-session 3D anatomical file. Note that the number of functional runs need not to be the same as in the original project from which the workflow template file has been derived. The workflows are colored grey since they have not yet been executed. Note that it does not matter for applying workflow templates whether specified Create Document workflows have been executed or not when applying template workflows.
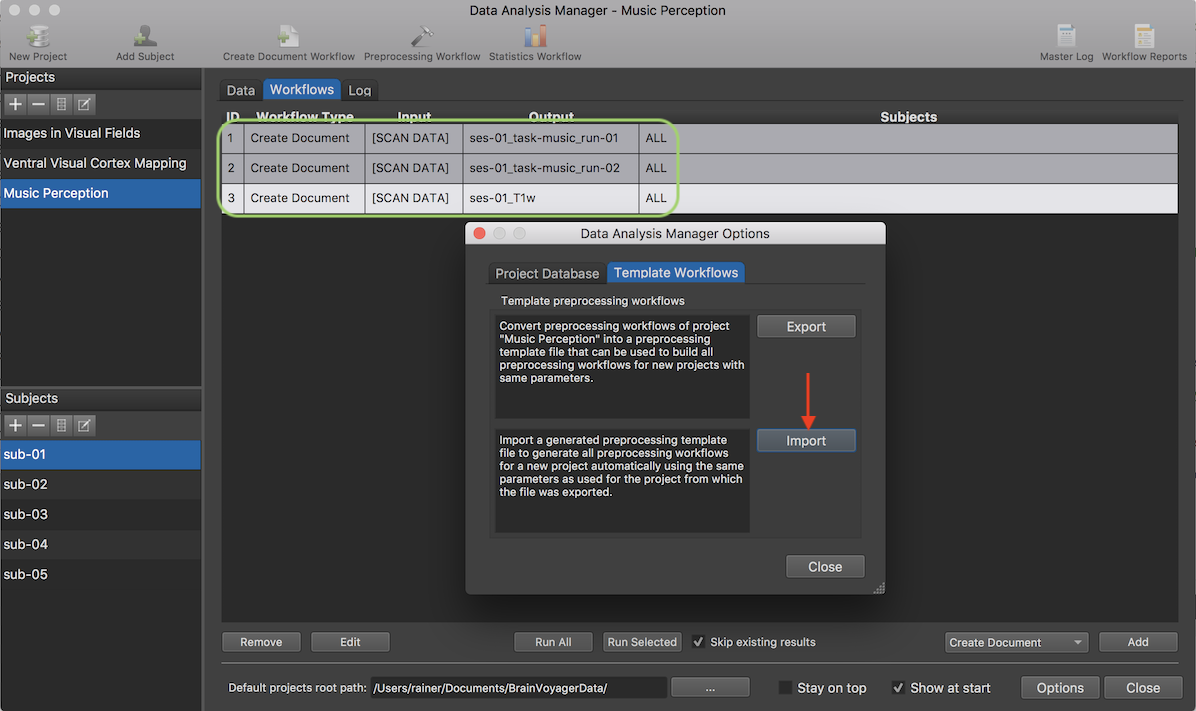
The screenshot above shows the Data Analysis Manager Options dialog that has been invoked using the Options button. In order to apply a template workflows file to the selected project, the Import button (see red arrow in the screenshot above) in the Template preprocessing workflows field located in the Template Workflows tab is used. After clicking the Import button, the desired template workflows JSON file can be selected in the appearing File Open dialog.
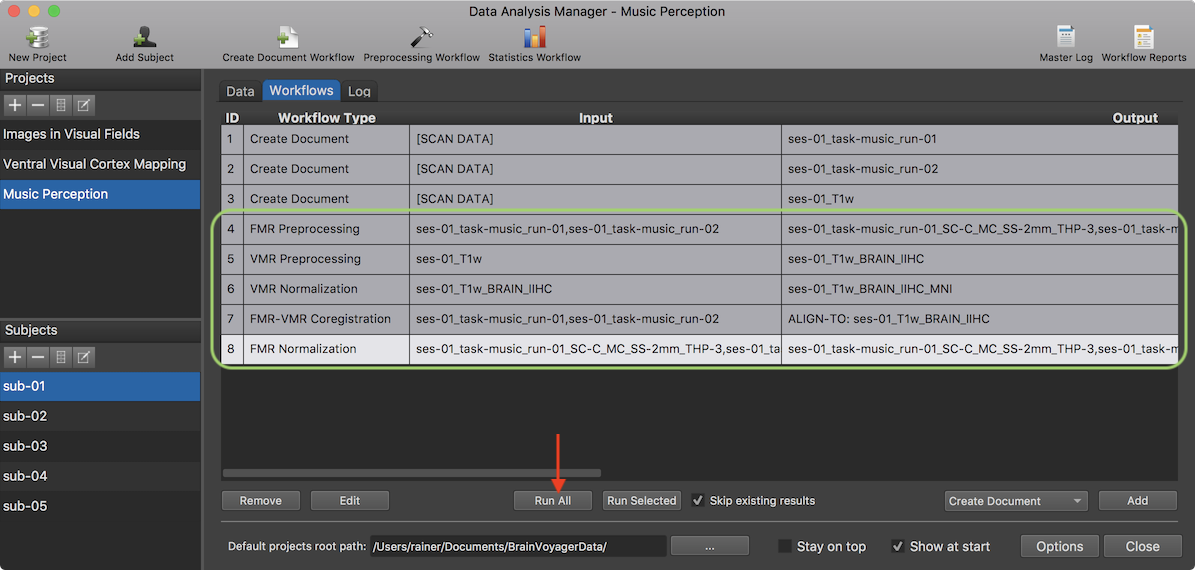
The screenshot above shows the Workflows table after application of the selected template workflows file (in the example case, the file generated earlier as described above). As can be seen, all sub-workflows applicable to the 3 input documents (2 functional runs, 1 3D anatomical document) have been created automatically as if they would have been created using the Preprocessing Workflow Definition dialog. The green highlight marks the generated 5 workflows that perform FMR preprocessing for the two functional runs, VMR preprocessing and normalization as well as aligning each run to the preprocessed VMR file, and finally creating MNI-normalized functional data sets for the two runs. Importantly, the specifications in the Parameters entry of the template workflows have been applied. As usual, all specified workflows can now be launched using the Run All button (see red arrow above) applying the workflows to the data of all subjects of the project.

The screenshot above shows the resulting entries in the Data tab for a slected subject ("sub-02") after the execution of all workflows have been completed.
Template workflows provide an efficient way to quickly define preprocessing workflows with the same parameters for multiple projects. Template workflow files can be easily shared among researchers to e.g. ensure that consistent preprocessing pipelines are performed by all members of a lab. There are, however, a few limitations and points to consider when using template workflows. While template workflows have been developed with the possibility to support multiple sessions, currently they are tested only for single-session experiments. While all FMR and VMR preprocessing sub-workflows will be created correctly, it might currently be happening that FMR-VMR coregistration sub-workflow would mix data from different sessions. This issue will be fixed for the next minor release. A more general issue is that some preprocessing parameters may need to be fine-tuned for specific analysis goals, such as tailoring the amount of spatial smoothing. It might thus be useful to create a few template workflow files with file names that reflect the intended analysis goal. Another issue are parameters for slice timing correction. It is recommended to enable the "SSTCUseSliceTimingFromHeader" option so that not a fixed setting is used but slice timing information as coded in DICOM files. For data from SIEMENS scanners, BrainVoyager uses the slice timing table from the extended SIEMENS header to ensure that slice timing is performed correctly for any slice order, including multiband (simultaneous multi-slice) scans.