BrainVoyager QX v2.8
Head Skin Segmentation and Reconstruction
To visualize the skin surface is very easy since the intensity values of the skin surface are much higher than those of the surrounding background. To improve subsequent head mesh reconstruction, the only recommended step is a "cleaning" procedure, which sets the intensities of voxels outside of the head to 0 ("black"). Since BrainVoyager QX 2.2 this can be done automatically using the Clean button in the Segmentation tab of the 3D Volume Tools dialog or in the 16 Bit 3D Tools dialog for 16-bit data. To perform "background cleaning" manually, the region growing tool and the reload marked tool located in the Segmentation tab of the 3D Volume Tools dialog is used.
In order to clean a 3D data set, simply click somewhere inside the head of the subject to specify a "seeding voxel" for a region growing operation. Since not just the brain must be marked but most voxels belonging to the head, a low value for the Min entry in the Value range field must be chosen. Useful values are typically in the range of 40-60. The Max value can be set to 225 (or higher). Note that the intensity of the seed voxel must fall within the specified range, otherwise the segmentation will not spread to neighboring voxels. To start the region growing process, click the Grow Region button. If the result is not optimal, i.e. does not include the head, or spreads into the background, adjust the minimum threshold and repeat the process. If the head is marekd successfully (marked with "blue" colored voxels), click the Marked button in the Reload field. This will reload the original intensity values for those voxels in the segment, but sets the intensities of all other voxels (i.e. outside the head) to zero intensity. One can then use the real-time volume rendering tool or the surface reconstruction tool (see below) to visualize the skin surface.
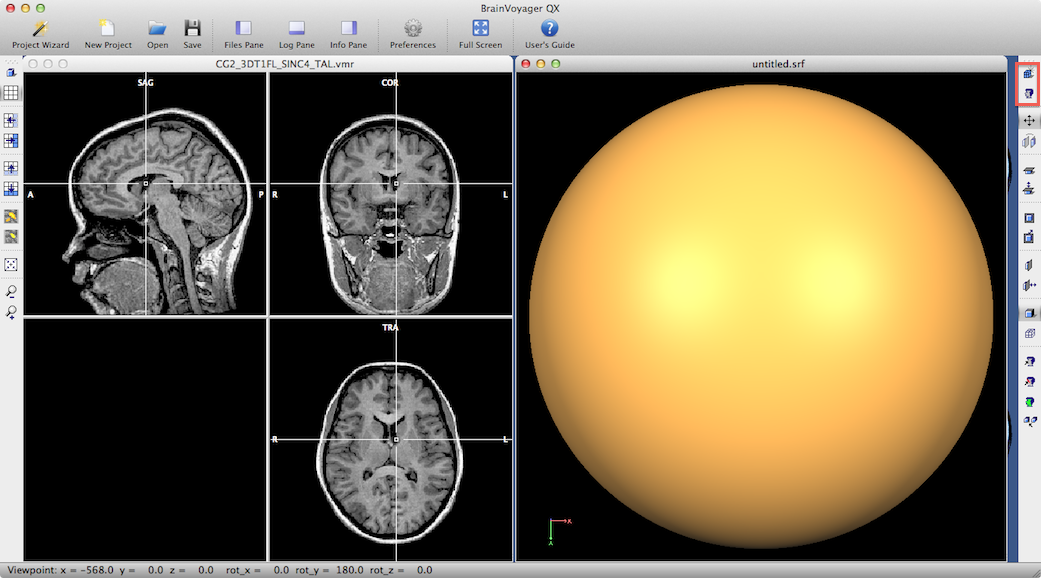
The snapshot above shows a cleaned VMR data set on the left side. In order to reconstruct the skin surface, a sphere mesh can be created in a surface rendering (OpenGL) window that is large enough to encompass the head. The easiest way to obtain a starting sphere is to simply click the Create Mesh icon (see red rectangle). When clicking then the Morphe Mesh icon (see second icon in red rectangle), the shpere mesh will shrink contineously stopping when it finds non-background (i.e. high) intensity values. The snapshot below shows two stages during this wrapping process (left side).
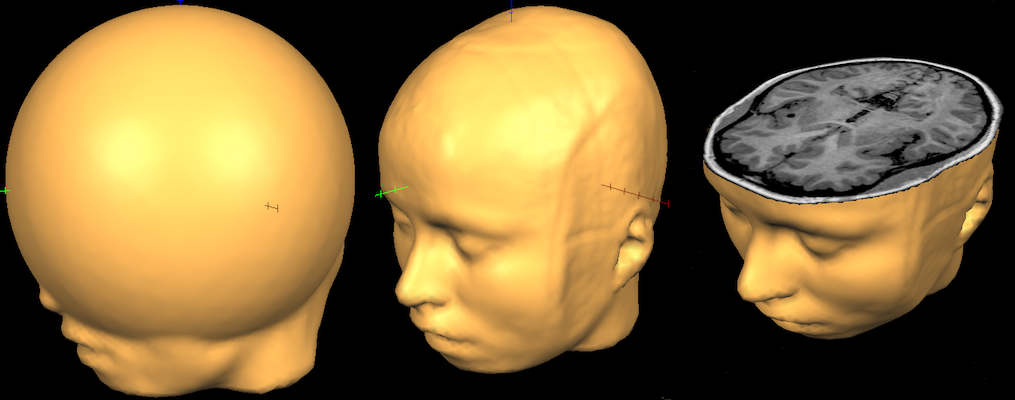
The reconstructed head mesh can be inspected and manipulated using standard features of the surface rendering window including mesh slicing (see right image in snapshot above).
Copyright © 2014 Rainer Goebel. All rights reserved.